
In part one and part two, we examined options for defending against Target Selection Limits (TSL), so-called “Sleaze Freeze”. We examined the various ways of using units in the “frozen” Location to defend against TSL. Ideally, these should be choices of last resort. In this article, we will examine options that don’t rely on the units being frozen. Let’s get started.
Using the Terrain to Your Advantage
Per D2.3, “… the interior of each hexside traversed must be clear of any obstacle depiction to the depth of an edge of a unit counter for VBM to be usable. Hold a unit counter vertically so that the entire thickness of the hexside is just visible along the edge—if the other edge touches any obstacle depiction, VBM is not allowed along that hexside.” If a wall/hedge is along the hexside being bypassed, then the entire wall/hedge must not touch the on-edge counter either. If the hexside is not bypassable, the vehicle must spend one MP to Stop in its present Location. It is then free to continue moving.
Recall from the previous articles, a Stopped vehicle is much more vulnerable to CC-Reaction Fire and Street Fighting. When setting up your kill stacks and key defensive Locations, is it possible to find non-bypassable Locations? If so, set your units in these Locations and you can safely ignore the threats.
Example 1
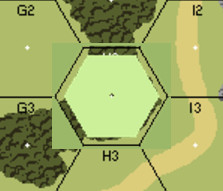
Refer to Figure 1. This is board 4 as shown in VASL. I am using an overlay from an extension called 5VBM.mdx. This overlay places a solid green hexagon in the center of the hex, leaving the original hex “exposed” to the width of a single counter. Any portion of the obstacle not covered by the green hexagon blocks VBM along that hexside. For hex 4H2, only the G2/H2 hexside is bypassable. This is potentially a good place to avoid being “frozen”.
Other options are units setting up in a double Crest Line hex. Vehicles cannot traverse double Crest lines (B10.52) making such positions difficult to bypass freeze. Even Locations with an Abrupt Elevation change (B10.5) can be difficult to bypass. Each level traversed costs 4MPs plus the cost of terrain. A tank executing a two level Abrupt Elevation change to “freeze” a Location needs 18 MPs (2 levels = 4MP each, COT = 1, doubled per D2.3) just to enter the hex!
Example 2
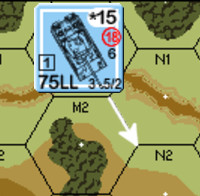

In Figure 2, consider the Panther in M1 trying to “Sleaze Freeze” a unit in M2. Even if it begins the turn in Motion, it is 18 MPs bypassing M2. The Panther could use Minimum Move (D2.15) to enter the Location. Otherwise, it would have to try for Excessive Speed Breakdown (D2.5) to get the MPs necessary to bypass the Location. If the German elects the Minimum Move route, this could take two or more turns to set up. As the defender, disrupting the attackers timeline is one of our main objectives.
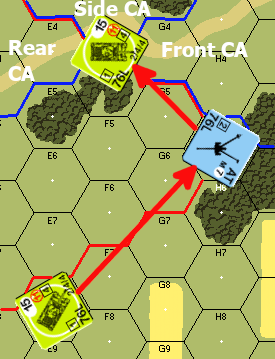
Consider the Panther in Figure 3. Given the Double Crest Lines in hex 50P3, the Panther can’t bypass this hexside.
Should you have them, Pillboxes are their own Location. An AFV inflicts TSL when it occupies your Location or presents a Triple Point Blank Fire opportunity. AFVs cannot “freeze” Units in a Pillbox since they cannot enter a Pillbox.
There are other options, but I am sure this is enough to give you some ideas. Knowing the rules here will help you a lot. I hope you notice that as a consistent theme throughout this series.
Mutually Supporting Positions
Having only one option for your defense just makes “Sleaze Freeze” that much more potent. You can’t allow your opponent to unlock your defense by moving a single piece. Have secondary units which can accomplish the same objectives, even if limited. This will force your opponent to at least take some risks.
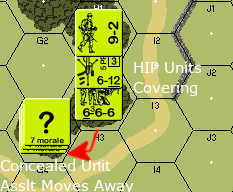
If you have Hidden Initial Placement (HIP) units, this is often a great way to spring a trap on your opposition. Seeing an easily “Sleaze Frozen” Location, your opponent prepares to rush across the now undefended terrain. Try to catch him moving in a stack or moving his only leader in this sector of the map. Removing his leadership can really blunt the attack and make it tougher for him to sustain. If you want to be really clever, move a Dummy stack or some Concealed unit out of the HIP unit’s Location to give your opponent a false sense of security.
Have units in ground level Locations able to attack “freezing” units on the ground level. If you can force a CT AFV to BU, the upper level is not “frozen”. Better yet, you might eliminate the enemy in an adjacent Location through Street Fighting. If you have a Gun, can you expect where the “freeze” will occur and set up to take a side-shot?
Fallback Options
Use the terrain to create a defense in depth. Try to create relatively fire-free paths to secondary and tertiary positions. These depth positions should allow the unit to fulfill the mission you have set for it. Hopefully, just as well as the initial position, but at least able to cope with the existing conditions of the terrain and time remaining to your opponent. If the AFV “freezing” remains in motion, fall back to a secondary position in your MPh if able. An AFV in Motion does not hold your units in Melee. If he advances Infantry in and you Ambush him, leave the Location before melee forms and fall back. Unless you have a chance for a knockout blow, falling back is almost always the better option.
Other OB Considerations
Other things to keep in mind when trying to defend against “Sleaze Freeze:”
– Molotov Cocktails can enhance your tank killing capabilities
– ATMM can easily kill AFV, beware of SMOKE from Burning Wrecks
– Panzerfausts for when you really want to reach out and touch someone
– Other LATW can fulfill the same purpose
– Flamethrowers are AFV killing machines
– Fanatics don’t have to pass PAATC, including Conscripts in RB factories
– Heroes add 1 to your CCV and a -1 DRM to the attack
– Tank Hunter Heroes can roll for ATMM
– Leaders add one to your CCV and can apply leadership DRM to the attack
Conclusion
Clearly, this series of articles are examples. I never intended for it to be exhaustive. I have hopefully shown that “Sleaze Freeze” isn’t as one-sided as new players think it is. There are plenty of options for dealing with it. Some are better than others. Not knowing all the options is self-limiting. Knowing all the outcomes should help to avoid not only TSL but also some of the negative effects of fighting it off. I hope this has provided some help.