
In this article, I am adding an example to my original article on AFV Combat (The Basics of AFV Combat in ASL). I briefly mentioned this topic in my earlier article but did not expand on it and I want to correct that omission here. I also hope to highlight a subtlety of AFV bypass movement I see misplayed all the time by newer players. Let’s get started.
Using Motion to Escape
In my previous article, I said “… AFV can also use any of those unmarked weapons in the DFPh to change CA to facilitate a quick escape (D3.12) in their upcoming MPh.” Let’s look at how this actually takes place. As we examine this example, I will once again break this down into “impulses”. This is not an “impulse” in an ASL sense. I am using “impulse” to break the actions down into “time packets” to facilitate understanding. Please don’t confuse these examples with any form of impulse-based movement ACTUALLY present in ASL.
Impulse 1
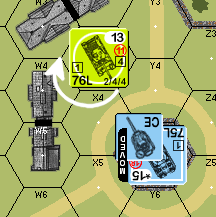
Assume the Panther began its MPh out of LOS of the Sherman. Assume the Panther enters Y5 and Stops having spent 3 MPs to do so. It then opts to end its turn there. According to D2.1, it uses all of its remaining MPs in the Location. For this example, assume it spent 4 more MPs in this fashion for 7 MPs spent in the Location. For the moment, it doesn’t look too good for the Sherman.
Recall from the earlier article that an AFV can make a Motion Attempt in the MPh by making a dr ≤ the number of MPs spent in its LOS. To qualify, the enemy unit must have started the MPh out of the attempting unit’s LOS. The Sherman qualifies to make a Motion attempt. Since the Panther spent 7 MP’s in its LOS, the Sherman automatically goes in Motion and chooses Forward Motion.
Also recall from the earlier article, an AFV successfully going into Motion may also freely change its VCA/TCA. The Sherman rotates two hex spines clockwise. The Panther fires but misses the Sherman in AFPh.
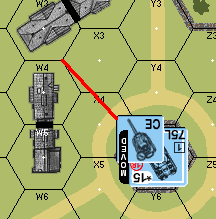
Impulse 2
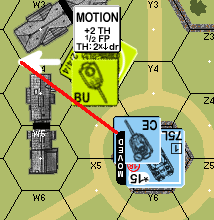
Figure 2 shows the situation at the beginning of the American MPh. The Panther has a -1 ACQ, which is not shown here for clarity.
The Sherman spends 2 MPs to bypass W3 via the W3/W4 hexside. The Panther would like to fire at the Sherman. Recall from D2.32, all fire traced to a vehicle in bypass is measured to the Covered Arc Focal Point (CAFP). ASL defines the CAFP as the vertex to which the AFV is facing (e.g. the vertex to the hull front), in this case the V3/W3/W4 vertex. The red line represents the LOS to the Sherman’s CAFP, and the LOS is blocked. Sadly for the German player, the Sherman escapes.
Alternate Impulse 2
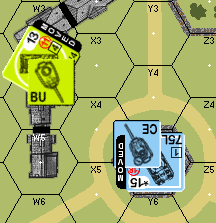
For this, assume the American player opted for Reverse Motion in Impulse 1 and freely rotated one hex spine anti-clockwise. Again the Sherman survives the AFPh. The Panther has an ACQ which is not shown for sake of clarity. In the American MPh, the Sherman uses bypass movement to bypass W3 via the W3/W4 hexside. This time, however, the news isn’t as good for the hapless Sherman.
Recall from D2.32, the CAFP is at the vertex to which the AFV is facing. The direction of movement does not play ANY role in determining the vehicle’s facing. Thus direction of movement has nothing to do with the CAFP. I have seen many players make this mistake. In this example, the CAFP is at the W3/W4/X3 vertex. Let’s remove the Sherman and take a look at the bad news.
As you can see, the LOS to the W3/W4/X3 vertex is clearly open. The Panther can shoot at the Sherman and if it does so, it would have a Basic TH# of 10. It’s DRMs are +2 Case J, -1 Case N, -1 Case P. It hits on an Original TH DR of 10 or less. It’s Original TK# is 23 with no modifiers. To make matters worse, this is a hit on the Sherman’s hull side. The Final TK# is a 19/15 depending on the hit location.
What’s worse, the Sherman spends 8 MPs bypassing the W3/W4 hexside. If the Panther misses or rolls a Dud on the To Kill DR, it can fire again with any ROF it may have or as Intensive Fire if the German player feels the risk is worth it.
Conclusion
I hope this brief article makes the passing statement in the original article a little more clear. I also hope the two contrasting examples highlight the importance of knowing where the CAFP lies. Until next time.—jim
Thanks Jim !!! Nice work
Thanks. I enjoy doing these.
It seemed counter intuitive (at first) that in example 1 you would pivot to turn your side to the Panther, but the Sherman is toast if it gets hit from any side, and it allows you to escape in MPh without a shot … that’s cool.
That’s the piece that some people seem to miss: the Sherman’s armor cannot stand up to the Panther’s MA. Its only real hope is to somehow get out of LOS. I am glad you found the article helpful.
The shot on the Reverse Motion Sherman is thru it’s CA. Wouldn’t that be a front hit to either the hull or the turret? Thanks
The one in reverse motion? See the article linked in that paragraph for an explanation of why that hits the side.
Oh wow that’s interesting. I always assumed vbm had the same rules. Thanks
Many people don’t realize how dangerous bypass movement can be. Now that you know, look for obvious places the enemy has to bypass and see if you can set up for a side shot on his “indestructible” AFV. It can be pretty demoralizing to loose a piece you didn’t expect to lose.