
In their most recent iteration of Illuminating Rounds, Dave and Martin were discussing the mechanics of AFV Bypass movement. They were discussing my recent article, Missing Example: The Basics of AFV Combat in ASL—Motion Escape. The guys asked what happens when an AFV turns in bypass and sorted it out, but I think the discussion deserves a little more attention. Allow me to expand on it here. Let’s get started.
Covered Arc Focal Point (CAFP)
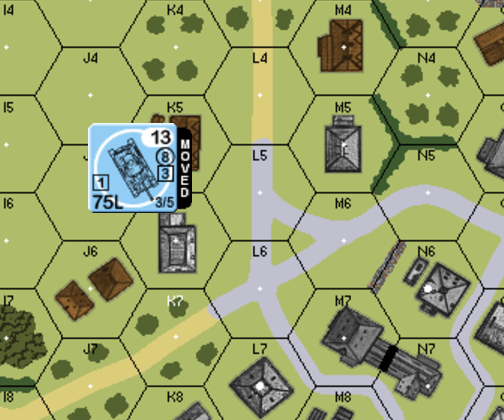
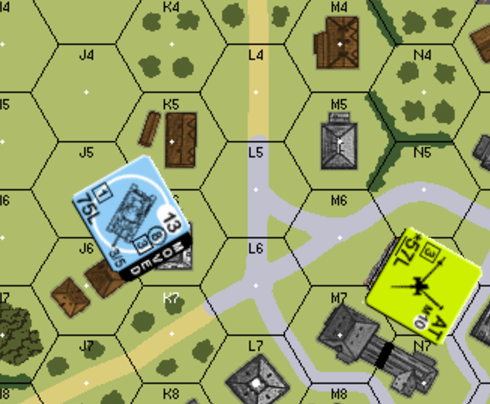
It is the German MPh. The Pz IV has moved into bypass of K5. All LOS to and from the Pz IV is measured from the CAFP, but where is it? According to D2.32, “When using VBM, the vehicle counter is placed on the hexside being traversed so that it straddles the hexside, with the VCA corner of the counter resting on the vertex of that hexside in the direction the vehicle is facing. This vertex is called the Covered Arc Focal Point (CAFP) and is the point in the hex where all fire to and from the vehicle is traced…” The CAFP for this AFV is at the K5/K6/J5 vertex. Direction has nothing to do with determining the CAFP. Even if the Pz IV were reversing in this position, its CAFP would be at the same vertex.
American Gun Appears
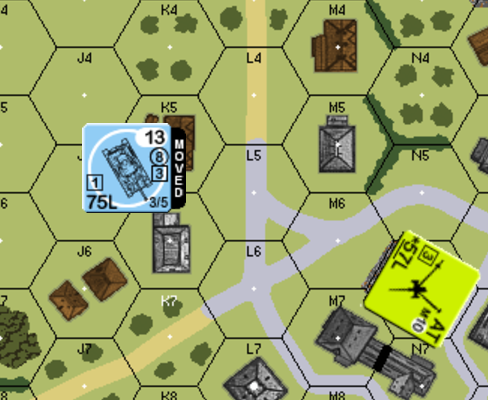
The Americans reveal a HIP 57L and declare a shot on the German AFV. Assume the Gun misses but keeps ROF. What happens next?
Assume the German player continues into bypass of K6. To do so, the German player announces a VCA change for 1 MP.1 According to D2.33, the American Gun may fire on this MP expenditure but how is this resolved?
Again, we refer to D2.33. Per that rule, “If Defensive First Fired upon or Immobilized before it can complete its move, it is considered to be at the same CAFP and Target Facing last occupied before the VCA change.” Even though the Germans have declared the VCA change, the Pv IV does not complete the VCA change until it moves into the K6/J5 hexside. All fire on the VCA change takes at the same CAFP and Target Facing it last occupied.
Determining Target Facing
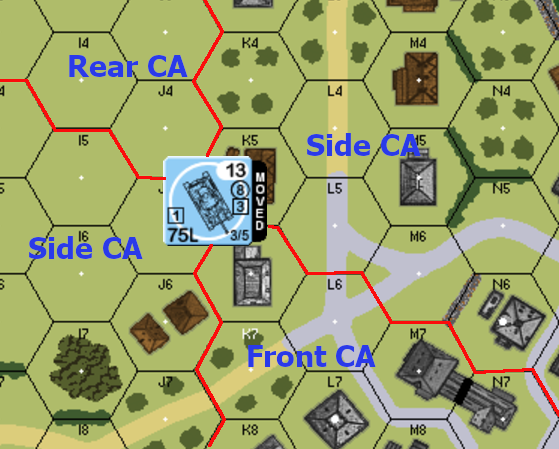
When a vehicle is in bypass, there is a unique way to determine Target Facing, unlike any other instance in ASL. Per D2.32, “The Target Facing of a hit vs a vehicle in Bypass is based on the hex it originated from (not the target hexside crossed as per normal Target Facing; 3.2)”. Notice, it is not where the LOF crosses the targeted AFV’s Location. Instead, we determine where the fire originates from. Referring to the diagram at the left, we see the American Gun is in the side TCA/VCA of the Pz IV. If the Gun hit, it would attack the side (box 3) armor of the German AFV.
As a defender facing behemoth AFVs, you should seek to create these side shots. Even here, by gaining a side shot the American player has significantly increased his chance to kill the Pz IV. Were the Pz IV instead a Panther, with 18 frontal armor and 6 side/rear, the American player has actually created a way to eliminate the Panther.
I have said this before, but it bears repeating: An AFV in bypass is defensively compromised. Such a bypass position can be powerful if your opponent hasn’t anticipated the opportunity, but that position can cut both ways.
A Last Bypass Subtlety Often Missed

For a last example, consider the figure at the right. The German player declares bypass of the K5 along the K5/K6 hexside. The American Gun has LOS to the K5/K6/L5 vertex and declares a shot. Is the German AFV within the Guns CA? Per C.5B “A firer that must fire within a given CA must have the hex containing the target completely within its CA—merely having the vertex (or hexside) aiming point forming a part of the boundary of its CA is insufficient.” Looking the Gun’s CA, hex K5 is NOT within its CA. If the American Gun wishes to fire, it must change its CA to hit the German AFV.
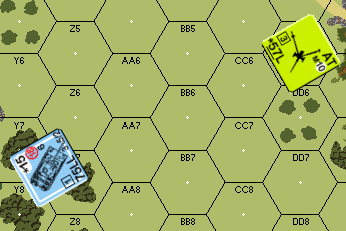
As players, it is important that we are pedantic about which hex we are bypassing in. We should also be just as pedantic with our opponents. It can make a big difference. Consider the example in figure 6. Which hex is the Panther in? If it is in Z7, the American Gun not only has LOS but the Panther is in its CA. If the Panther is in Y7, the Gun has LOS but must change CA to shoot. As a player, we must insist on clarity lest a wily player decide after the fact the Panther was in Y7.
Conclusion
Thanks to Dave and Martin for their excellent series. A further thanks for their question which led to this article. Without questions from the community, articles like these are not possible.
I hope this continues to expand on knowing where CAFP is and which hex the AFV is ACTUALLY in when in bypass. These two pieces of information play a critical role in determining how to deal with an AFV in bypass. I hope these have helped clarify this for you. Until next time. — jim
A. If Defensive First Fired upon or Immobilized before it can complete its move, it is considered to be at the same CAFP and Target Facing last occupied before the VCA change. (D2.33).