I recently examined this scenario for a Banzai! article so it has appeared previously there. Please go check out this excellent newsletter from the Texas ASL club.
I am going to examine BFP42 Bukit Full of Trouble, published by Bounding Fire in Blood and Jungle, using my ASL Maxims. I hope to showcase how these simple guidelines can help figure out how to play a scenario you have never seen before. The cool thing is Matt Shostak also broke down this same scenario. Through this, we’ll all see there is almost always more than one way to do it. Please go have a look at the Bazai newsletter to see Matt’s take.
For the sake of transparency, I must confess I do a lot of technical editing and proofreading for Bounding Fire. While I don’t think this affects my analysis of the scenario, I want my readers aware of the relationship in case I show some unconscious bias.
Maxim 1: Victory Conditions
As VC go, these are pretty straightforward. The Japanese need to control all buildings in the Australian setup area at game end. Looking at the board, this means the Japanese must capture ALL buildings to win.
We need to look at the control rules to make sure we understand what this means. Per A26.11, all buildings in the Australian setup area begin controlled by the Aussies at game start. To gain control, the Japanese must occupy a building with an MMC while no Aussie units are in the same building. Even a broken unit upstairs can deny the Japanese ownership of a building. This means at least one Japanese MMC must survive to reach every building to flip control.
Looking at SSRs, we see the Aussies do not get any HIP units. The Japanese won’t have to hunt down HIP units that might appear later to take back a building. Also, No Quarter is not in effect allowing the Japanese to Mop Up the two-story buildings on board 43. Later, after capturing these buildings, the Japanese can declare NQ since none of the other buildings have upper levels.
Maxim 2: Terrain
PTO terrain is in effect with Light Jungle. By SSR, all roads remain and are paved. Also by SSR, huts are wooden buildings. Examining the map, the Japanese enter from the North and must be able to reach the furthest corners of the maps and must do so before the APh of their turn 8. Failing to do that, the will lose as they won’t be able to occupy the buildings.
The furthest buildings to capture are 18 hexes from the Japanese entry area. Across eight turns, the Japanese need to average over 2 forward hexes of movement each turn to even have a chance. If they want some cushion, they probably need to average 3 hexes of forward movement. This means moving 2 hexes during the MPh and one more in APh. Easily within the realm of possibility.
The roads and paths represent the high-speed avenues of approach. Japanese Infantry can traverse those Locations for 1MF. The Japanese should expect those to be covered by fire. As the Aussies, you have better cover them by fire. Your aim here is to slow the Japanese down. Somewhere, you need to slough off three turns of movement from Japan’s finest. If you do that, you’re probably going to win.
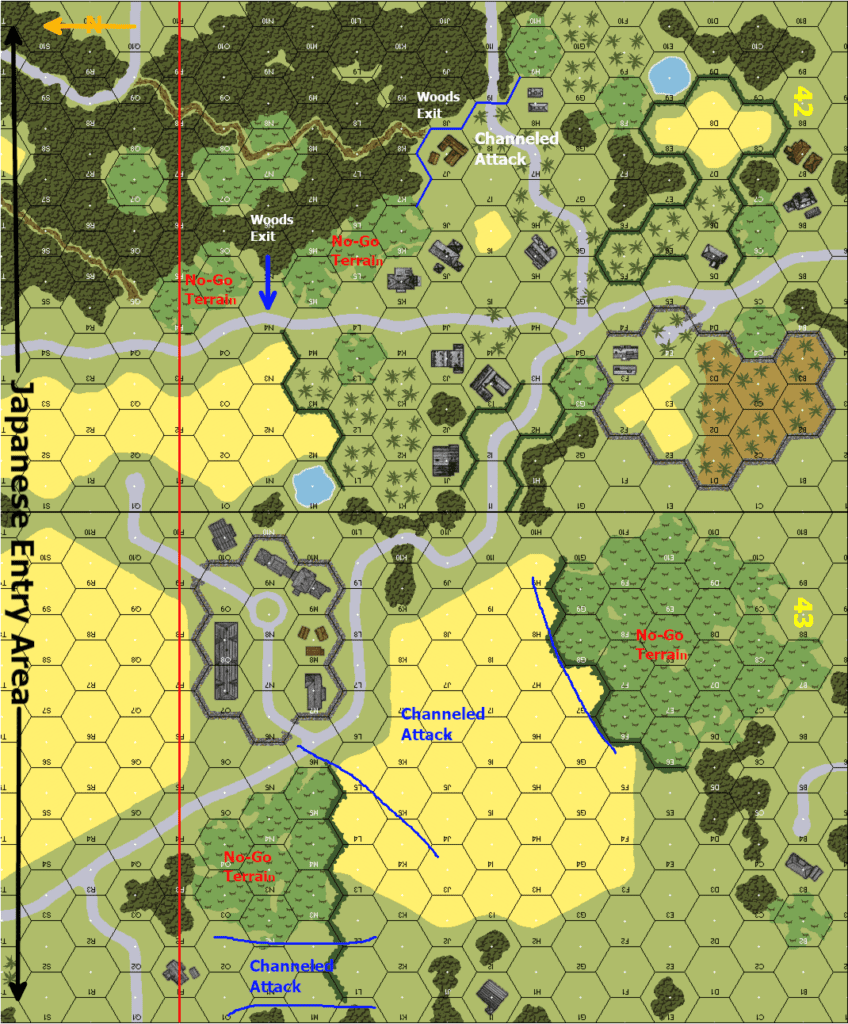
Examining the terrain, it is easy to see how the Japanese attack might be channeled into killing zones. Sadly, there are no great killing zones. There are huge bamboo clusters on board 43. The bamboo hex in 43B2, next to the 43B2 victory building is concerning as it will limit the options of the attacking Japanese to get to this Location. We must consider all of this when making our plan.

Influence on Infantry Movement
Fast-Go: Open ground, trails, roads all cost 1MF but provide no cover or hindrances. When possible, the Japanese must use these to speed the pace of attack. The Aussies must deny the usage of these or make the cost to use them dear.
Slow-Go: Kunai, jungle, and buildings all cost 2 MFs for Infantry. This will effectively slow the Japanese down, but given the need to “only” move 2 hexes per MPh, this isn’t enough to make it impossible.
No-Go: Recall, when PTO is in effect, Brush becomes Bamboo. Infantry can enter only through Minimum Move or Advance vs. Difficult Terrain. While not technically No-Go, for all intents and purposes, entering these Locations will cost the Japanese a turn of forward movement and is doing the Aussie’s job for them. For this reason, Bamboo is No-Go Terrain. The Japanese should not overlook bypassing key No-Go Locations if an opportunity to enforce target selection limits or negate a key fire lane presents itself.
Influence on Vehicular Movement
Fast-Go: Open Ground and Roads. AFVs can’t use paths. The good news is the Aussies only have one AT-Gun and a couple of ATRs. The Gun is a genuine threat and the ATRs can cause some damage but are about the same threat as an MG. They can’t be everywhere.
Slow-Go: Kunai will cost 2MP’s. This will slow down the AFV advance but is not crippling as the Infantry can’t advance much faster.
No-Go: Bamboo, Jungle, and building hexes can be entered with half or more MPs and a Bog Check. As long as you’re happy with that Location being the last place you enter for the game, you can risk the bog. Otherwise, it is No-Go terrain. Also note, with the buildings it’s possible to fall to the cellar, so you must keep that risk in mind too.
Visualizing the Terrain’s Influence on the Battle
As mentioned in the terrain section, we can push the Japanese attack into channels. An attack through the board 42 woods only has a 4-hex wide exit (42K7 – K2I9). There are other exits but those push through even more woods or hexes, slowing the attack further. As the Japanese, I would expect to see stubborn resistance through those woods.
The bamboo mass on board 43 effectively cuts the Japanese attack in two. If the Japanese commit too many resources to one side this mass, shifting resources back to the other side is going to be time-consuming and could cost the Japanese the game. For the Aussies, they can use 43B7 as an initial setup Location and then shift some reinforcements to either side once they see how the Japanese attack develops.
A fire lane through the big Kunai mass on board 43 can slow Japanese movement. Remember, Kunai is a soft hindrance. Kunia negates FFMO, but FFNAM will still apply. The Aussie HMG will lay down a 4FP fire lane with a -1 DRM. That is not to be trifled with.
Maxim Three: Time
Eight turns seems like a lot of time in modern ASL but as I noted above, you must travel from the north across the entire map, in that allotted time. You must move at 2+ hexes a turn to arrive at the B-row VC buildings, assuming you move in a relatively straight line. Taken in that light, 8 turns isn’t a lot of time.
Maxim 4: Order of Battle
Identifying strengths and deploying to maximize the effect of these is a key objective for every side. Our goal here is to understand the capabilities, strength, and weaknesses of our own and our enemies order of battle and to maximize the effects of our strengths and the enemies weaknesses. Through this, we hope to whittle his force down and tie it up such that he cannot deny us the victory.
Assessing the Japanese OB
What should strike you right away as either side is the Japanese armor is basically unopposed. Not only is it unopposed, but there is no requirement to have any left at the end. As the attacker, you need to use this to reduce MG positions or to enforce target selection limits on them. You can’t allow fire lanes to further channel and slow down your attack. While they won’t be much use through the woods, they can certainly help you push through board 43. Don’t be afraid to use them aggressively to get onto the board and push the board 43 building cluster around N8.
The Japanese OB also includes two flamethrowers, four leaders, and 4 demo charges. Setting aside the flamethrowers for a moment, an experienced Japanese commander will see 4 leaders and 4 demo charges and think to himself that’s four banzai charges with 4 DC-heroes. As the Aussies, you better be prepared to lay out RFP and understand how to defend against this. The flamethrowers are there just to mop up once the banzai has soaked up all your shots and put your units into CC. Remember, a flamethrower can shoot into a CC Location and only affect enemy units. CC is not melee. A cogent Aussie defense needs to get rid of the flamethrowers if at all possible.
The Japanese OB also includes three knee-mortars which have some good SMOKE capability. You can expect to be shrouded in SMOKE when the banzai lights off. I hope you have planned for this because once it sets off, it’s too late.
Lastly, the Japanese get one plane with bombs. This can be a nuisance, or worse. As the Aussies, you have to be careful not to give the Japanese an easy sighting task check and multiple attacks in a strafing run.
Assessing the Aussie OB
The Aussie OB should also strike the Japanese with some fear. The 9-2 on an HMG can seriously cause some damage. Even if you “bypass freeze” his Location, he is likely to ambush, kill something, and slink away to do it all over again next turn.
The Wire and Mines are going to channel your attack even further. If stacked as Wire/Mine combos around the 43B3 victory building, this will challenge the Japanese. An AFV can create a TB through mines, but it only has a 1 in 6 chance of removing the Wire. Since you can’t CX the turn you attempt to get beneath Wire, there is a 1 in 3 chance the Japanese unit won’t be able to move beneath the Wire if no leader is present. If there are mines in the hex, that could be a 6 FP attack to get on and another leaving the Location. If the Aussie stacks a HS under the Wire, the +1/-1 CC attack DRM could also further spoil the Japanese attack.
Making a Plan
Having done the analysis, setup should be rather easy. There will be some hard decisions, but at least we should be able to make some solid plan for the first couple of turns. Of course, for the Japanese, a lot will depend on how the Aussies setup. I am a firm believer in taking what they give you. And taking the next thing. And the next thing. Until the next thing is too much.
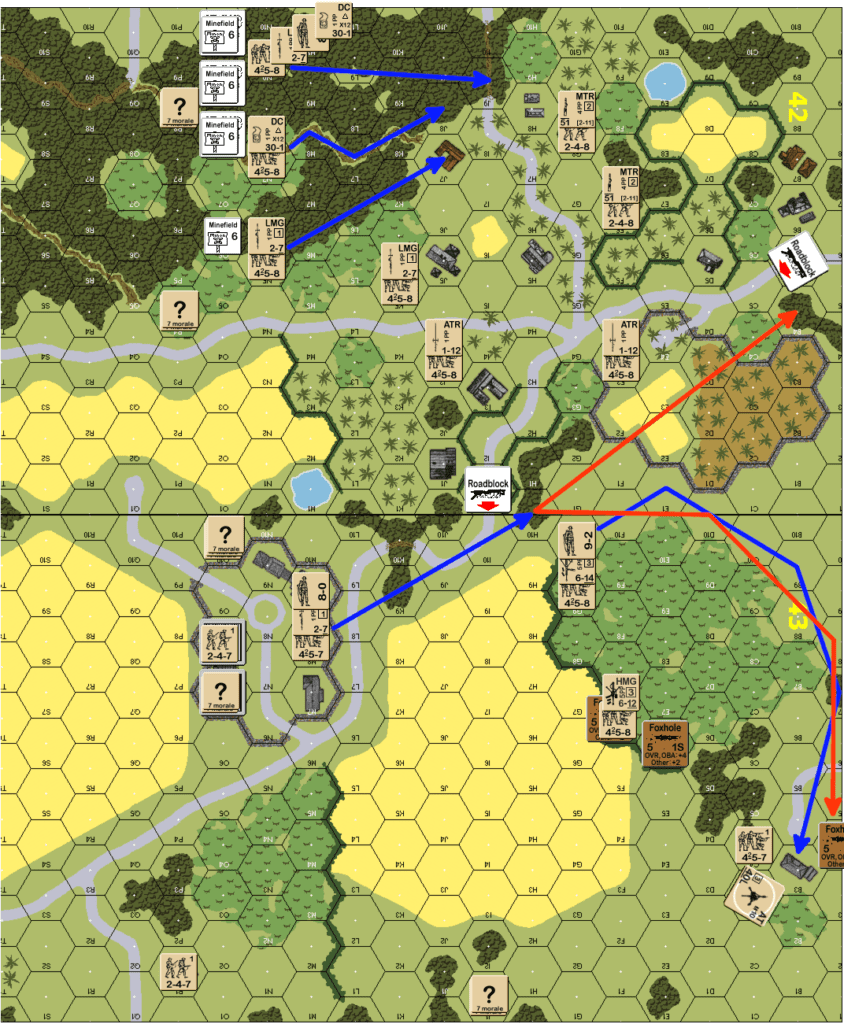
As the Aussie, I am looking to hold at least one building at game end (Maxim 1). Remember, VC comes before everything. Let’s look at my proposed Aussie setup:

On the top half of the map, I am looking to inflict maximum pain. All the wire is doubled up with mines. Not only will this slow the Japanese down (Maxim 3), but it will also reduce the size of his force (Maxim 4). With MCs created on a 7, I can expect to whittle him down some. I also have direct fire over every Wire obstacle to inflict more damage. What I won’t do though is sit there and let the Japanese banzai me as the 8 MFs is more than enough to get under the Wire. The blue arrows show the fall-back plan. I am hoping to make this take 3 – 4 turns (Maxim 3) by playing a fighting withdrawal.
The 9-2 needs to deploy the 4-5-8 on the HMG ASAP. This will allow them to play CX the HMG HS for extra movement and transfer in APh to avoid CX penalties games. This allows the 9-2/HMG the most flexibility to move about the map buying the Aussie player time (Maxim 3). It may not look like it, but the 9-2 is in position to make either the 43B3 or 42B6/B7 the Alamo depending on the Japanese attack (Maxim 1, my primary goal). The 4-5-8/ATR squads in the center can also flex to either side as needed.
The HS in 43P1 is there to slow down a board edge creep (Maxim 2/3). I am worried about putting stuff in the 43O7 building. The Japanese can CE/sleaze freeze the upper levels taking a PAATC to even advance into the AFV’s Location in my turn. The effectively turns this building into No-Go terrain for the Aussies (Maxim 2). Anything upstairs is just dead before the Japanese even enter. You could counter this by putting the 40L in 43N9 and shoot anything in bypass of 43O8/O9 hex side (side shot) or the 43O6/O7 hex side (side shot) for a nasty surprise (Maxim 4). Given this would take place in turn 2, the Gun would likely fall to a banzai shortly. You could bore sight one hex to offset motion/moving vehicular target penalties. Don’t be afraid to IF a Gun placed here. It won’t last long anyway.
The 8-0/4-5-7/LMG combo is there to fall back, ostensibly to the board 42 Alamo, but he could also fall towards 43B3 as needed (Maxim 1). Delaying this decision as long as possible will also make it harder for the Japanese to decide how much force to send to each side of the board 43 bamboo mass.
The 50mm mortars cover all the jungle exits (Maxim 3/4). If you’re bold, you can Acq them up early and wait for the Japanese to come and take the 2-1 shots you have prepared for them. Don’t forget the RFP shifts one column in your favor for the -1 DRM.
Foreseeing the End Game
If it isn’t apparent by now, the planned Alamo is 43B3 (Maxim 1). The Gun’s placement there gives it excellent fields of fire for this terrain (Maxim 2). The 4-5-8/HMG combo in 43F6 can lay fire lanes through the Kunai to break up Japanese banzai attacks (Maxim 3/4). He can also “skulk” into the foxhole during its MPh to avoid fire (Maxim 2). He will also slowly migrate to D5 as the situation dictates. Leaving the bamboo is a risk as it means a banzai can reach you now. Do so with caution.
The 9-2 and second HMG could also place another fire lane. This has some pretty significant punch when it arrives in the B3 area (Maxim 2/3/4). I recommend recombining the HSs once they have toted the HMG here. Use the non-cowering squad to lay the fire lane, allowing the 4-5-8/9-2 combo to clean up anything that comes close with a First Fire shot of their own.
Conclusion
That’s my take on it. I would probably reassess my plan around turn 3 to see what the Japanese are doing. As they say, no plan survives first contact. There is no reason to assume this one will either. I hope you enjoyed this article. I know I enjoyed writing it.

