
This is the last in my Basics of AFV Combat in ASL: Tank vs. Tank series. In this one, I discuss odds and ends of AFV play that might come as a surprise to newer players. Everything discussed in this article is within the rules and, applied correctly, could tip an engagement in your favor. While I am calling these things “dirty tricks” there is nothing particularly odious or reprehensible about them. They are just as likely to make you curse your opponent because you might not have considered it. Let’s get stuck in.
Bypass Freeze
I will not delve too deeply into the topic here except to say it is a thing. An enemy AFV bypassing a unit’s Location inflicts Target Selection Limits on it (A7.212). I have written a whole series of articles on my blog covering Bypass Freeze and how to defend against it. Used in the right situations, “Bypass Freeze” can unhinge an entire defense. I refer you to those other articles for a more in-depth discussion of this topic.
Bypass to Reveal Your Units
So this point seems counter intuitive to me. I refer you to A12.41-.42. A12.41 says Personnel may attempt a PAATC to keep Concealment when an AFV enters its Location without using Bypass. Should it pass its PAATC, the Personnel unit keeps Concealment even if the AFV ends its MPh in its Location.
Contrast this with A12.42 which says Personnel units voluntarily lose Concealment when an AFV enters their Location in Bypass but automatically lose Concealment if an AFV ends its MPh in Bypass of the unit’s Location. Seems odd to me a unit in the open can keep its nerve while a unit in a comfy stone building cannot.
Evil Things to Do In or Around Your Hex
Most of these things are not limited to AFV vs AFV combat. An enemy AFV in your hex may:
- Enter your Location/Hex and activate its Smoke Dispenser. Successful deployment will place a +2 SMOKE counter in your Location adding a +3 DRM to any subsequent shot out of that Location. AFVs without a Smoke Dispenser could attempt to use a vehicular Smoke Grenade (D13.35) albeit with a risk of being shot at while CE.
- This one is akin to the bullet above, except this time, it’s “Russian” Smoke. In this, your opponent uses an OT AFV to bypass freeze your Location. If you cannot kill the AFV, it inflicts Target Selection Limits. If you kill the AFV, chances are you created a burning wreck in the Location. Wrecks have the same +2 SMOKE DRM. This is sarcastically called “Russian Smoke” since most Russian AFVs do not have a Smoke capability.
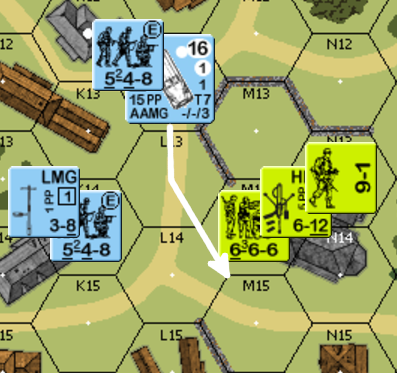
- A turreted AFV carrying Riders may enter an enemy’s Location and change its TCA (“sweep the leg”). This TCA change forces the Riders to Bail Out in the hex. Sure, the Riders will have to take an NMC. But even a broken enemy in your unit’s Location inflicts Target Selection Limits. There are extra style points for knocking out an enemy AFV this way. Personally, I call this the Fortenberry Special since Gary did this to me so many times over the years.
- A halftrack can unload in your hex, even in bypass, and inflict Target Selection Limits in the same way. Keep in mind the limitations of stopping in an enemy AFV’s hex. When you can pull it off, it is a pretty cool surprise.
Read the Vehicle Notes
Some surprising AFVs–especially American halftracks–carry an inherent AT asset. They may fire as non-turreted weapons, but an American M20 Scout Car is a greater threat to your Panther than you might think.
Even better, some AFVs come with removable Support Weapons or an inherent Personnel unit. The US M3A1 Scout Car (Vehicle Note 39) contains a 3-4-6 HS or a 2-2-7 Crew as Passengers. These passengers are in addition to the AFV’s inherent Crew. Not only that, but the crew AND Passengers can remove some or all of its armaments (D6.631). This might add two Crews–both capable of Self Rally–and an MMG/.50 cal HMG to your OB.
Other AFVs can unload mortars. We already mentioned AT assets above. If your opponent isn’t prepared you can surprise him with a little knowledge. READ THE VEHICLE NOTES!
Smoke ‘Em if You Got ‘Em
When in Final Fire, don’t be afraid to shoot SMOKE into an enemy unit’s Location. It is placed as Dispersed SMOKE and goes away in the upcoming PFPh, but that’s a problem for later. If simply surviving until PFPh is an issue and you can’t kill the thing about to kill you, then the added DRMs for SMOKE just might save your bacon.
Creating Something From Nothing
Another option is to shoot HE. Using Area Target Type (ATT) and the C1.55 TK process can create a chance were none seem to exist. Imagine your Sherman comes across a Panther and has no MPs left to scoot out of the way. A 75mm Sherman MA has a Basic TK# of 14. Absent a Critical Hit, the Sherman’s best Modified TK# is a 15 (16 from the rear). Compared to the Panther’s 14/18 TCA/VCA armor, a Sherman has little chance for an effect (double 1 is a possible Shock).
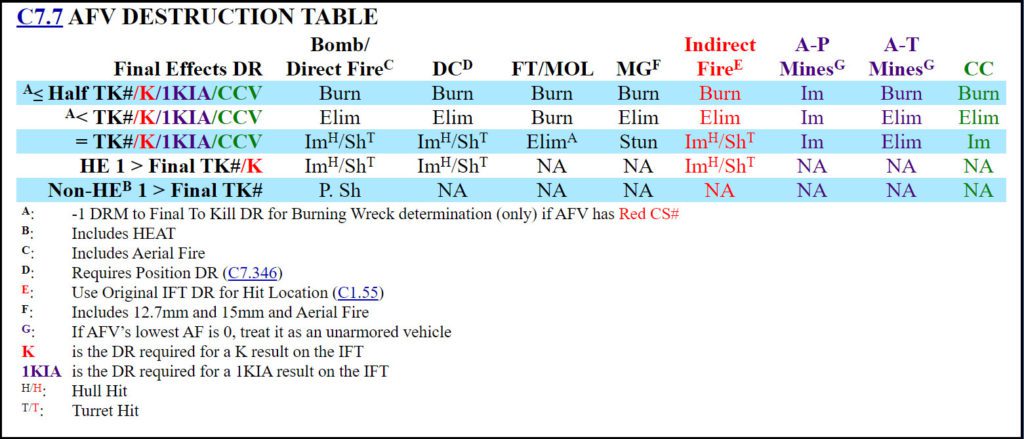
Instead of AP, shoot HE using ATT. A 75mm Gun attacks on the 6 FP column. Cross-referencing the C1.55 table, there are no DRMs applied to the attack against a Panther. If the shot hits, roll an attack on the IFT 6 column and cross reference the result to the AFV Destruction Table. If you roll a Final 3/4, the result is 1 greater than or equal to the K/# on the 6 column. That yields an automatic Shock on a turret hit or an Immobilization on a Hull hit. If you roll a Final 2, the result is a 1KIA, eliminating the AFV. The odds of a combat effect after a hit have improved from 1 in 36 to a 1 in 6. The only downside? You can’t shoot ATT in Bounding First Fire.
Deliberate Immobilization (C5.7) is another low odds attack that can generate a chance for a mission kill. If you are firing ordnance with a Basic TK# > the lowest hull armor factor of the target, a hull hit automatically Immobilizes the target. When comparing TK# to hull armor factor, the target facing does not matter. Even if firing through the target’s frontal armor, the side armor will usually be lower and used for this comparison.
Providing Cover for an Infantry Assault/Retreat
On the attack, lead with your tanks, especially if your opponent has no or limited AT assets. Tanks out front can shoot SMOKE to obscure the Defender’s vision. If they move after your Infantry, they can provide a +1 Hindrance to incoming fire passing through their Location. If they start co-located with Infantry, they can conduct an Armored Assault. Armored Assault provides a +1 TEM to units moving with them (canceling FFMO offsetting FFNAM for a net DRM 0).
An AFV which moves normally provides no Hindrance if it remains in Motion. A Stopped AFV (or Wreck) provides a Hindrance AFTER the AFPh in the turn in which it moved. A Stopped AFV that used Armored Assault with Infantry provides cover during Defensive First Fire and in Defensive Fire. Players often miss the latter point, especially the part where the AFV must be Stopped to provide cover.
Special Ammo
AFVs having Special Ammo can use this depletable ammo to get two chances to roll low. This works best in AFPh when the TH#s are close to depletion numbers. This affords an AFV multiple attempts to hit a target. You can use this even when its normal ammo is likely to kill the enemy. You can’t kill what you can’t hit. Having two chances to roll ≤ 6 is better than one.
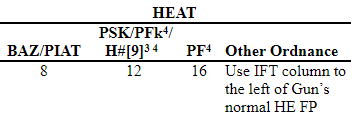
Most folks know to use the AP/APCR trick but do not know they can do the same with HEAT. Personnel units receiving wall/building/rubble/pillbox TEM can be shot with HEAT. When hit, the effect isn’t as good as HE. But again, you can’t hurt what you can’t hit. Two chances to roll low on the TH DR are better than one.
Buggering the Crunchies
I plan on writing at least one article covering AFV vs Infantry combat and I will expand on some of these there. I mention them here because they are definitely dirty tricks you should add to your game play.
- AFV mobility makes them great candidates to deny rout paths. Cutting rout paths sets enemy Infantry up to Surrender or be eliminated for Failure to Rout. You don’t need to be ADJACENT to deny a rout path. Don’t throw away an AFV to eliminate a Conscript, only to have an AT asset pop up and destroy your AFV (unless the Conscript is all that stands between you and Victory, of course).
- Tanks don’t cower. That 2+3 AFPh CMG shot is enough to cause an NMC. Couple that with a multi-hex fire group to complete the Encirclement. Just make sure you take the Encircling shots consecutively.
- An AFV can move AFTER the Infantry to see how they weather the assault. If some of your attacking Infantry are broken, the AFV can move behind your broken units and make Smoke Dispenser attempts or Stop to create rout paths through otherwise Open Ground.
Last Word of Advice
As I bring this Basics of AFV Combat in ASL series to a close, I would like to leave you with one last word of advice. Guy Chaney used to say “Tanks don’t rout”. He used to say it so much I can’t believe it took me this long to pass it along.
When you decide to put your AFVs at risk, do it with a purpose in mind and do the best you can to create a favorable situation. An AFV doesn’t have to use ANY of its MPs in a turn. Sometimes, denying ground to your opponent can be more valuable than putting your AFVs at risk. If you must do so, do so with a purpose and a plan (and hopefully with the likely outcome favorable to you). But if they are destroyed, well they can’t rout back to a leader and recover for next turn.
Conclusion
I hope you enjoyed this series as much as I have enjoyed writing it. I don’t claim this series will make you a cardboard Rommel, but maybe it will help you avoid your own Kasserine Pass nightmare. Remember, as ASL players, we don’t write cardboard letters home to cardboard parents. As long as you’re learning and improving, even a defeat can become a victory in the long run. Until next time. – jim
version 1.1
Does the procedure you highlighted of the Sherman Vs panther firing ATT works also if simple using HE instead of AP?
It only works with HE. You cannot fire AP as ATT.
yes, but if I shot with HE using the VTT?
Then the C1.55 rules do not apply. You would look at the HE and Flame TK table to find the Basic TK# for your HE round and apply that against the Armor Factor of the Target Facing. If you fail to destroy the AFV, you would get a Specific Collateral Attack against and vulnerable PRC. I did not cover Collateral Attacks in the initial article though.
Bypass to reveal Your units:
.. in practice, with this rule (A12.41) a HIP can decide to voluntarily appear during close Combat Ph to attack the vehicle.
Ops! “..not voluntary”,
but placed on the map with a “?” counter at the start of the CCPh because the hidden unit starts the phase in the same hex with enemy units (A11.19).
Still not quite right 🙂 From the Gain/Loss chart (Case A): … is in an obstacle where a vehicle ends its MPh in Bypass (A12.42) …
Remember, HIP is just a form of concealment. Hope this helps. — jim
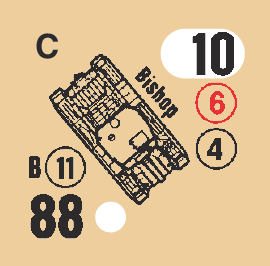
Hi Bishop,
I was referring to the first part of the article where you talk about a vehicle entering a hex or stopping (A12.41) where there is a concealed/HIP unit will not be automatically detected.
Thanks anyway for the clarification.