
I have been playing ASL with new friends a lot lately. I have also received questions both here on my blog and on Facebook regarding some of my previous articles. Unfortunately, there is a common thread in these questions: the AFV Destruction Table and how to read it. For AFV Combat in ASL, clearly understanding this table is key to understanding your options and the relative effectiveness of potential attacks. In this article, I will endeavor to explain the chart and hopefully clear up some of the confusion caused by the presentation. Let’s get stuck in.
A Quick Look at the Table
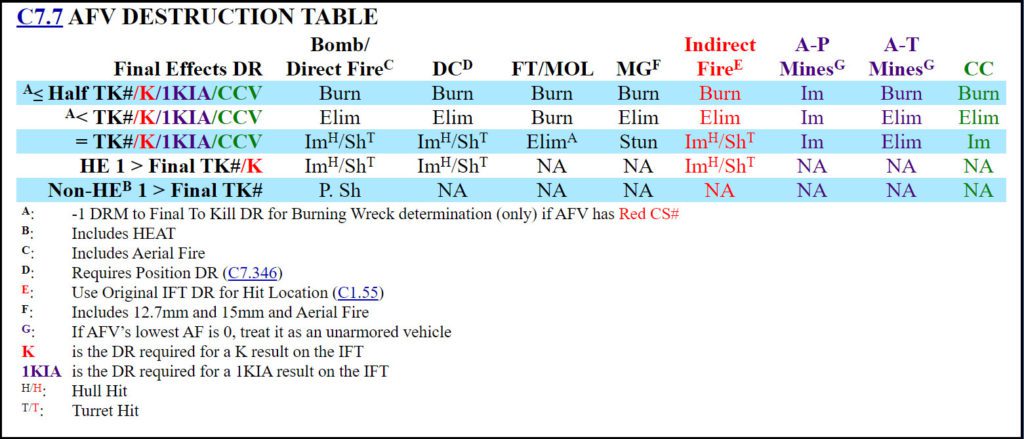
Above is the table in question. There are actually four separate tables in this one. The tables share common outcomes which make this possible. Some players see the virgule (/) character referred to as “and/or” in the ASLRB index. This is misleading. The virgule is there merely as a separator. The individual tables are color coded. Recognizing and using these colors correctly is key to interpreting this table.
First Things First
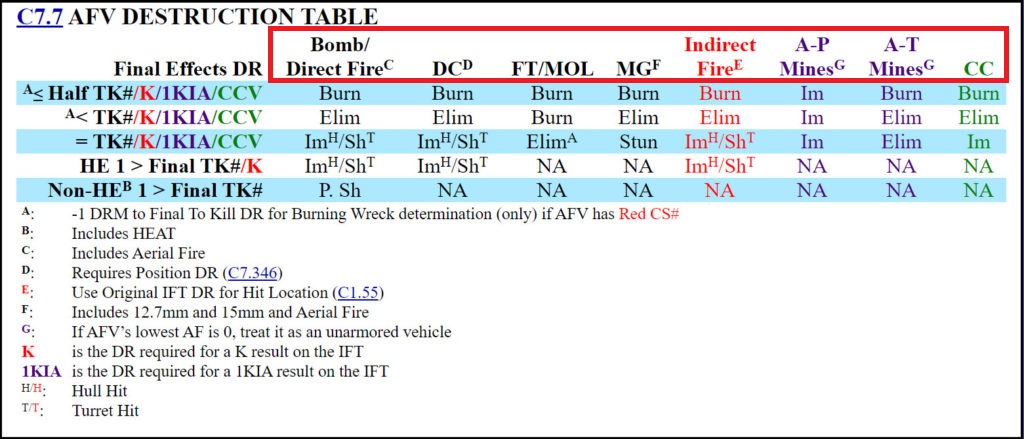
The first step to utilize this table properly is to identify the attack type. These are in the red box in figure 1 (Bomb/Direct Fire, DC, etc). Each of these attack types have a color and a column below also in that same color. The things in the column below the heading reflect the possible outcomes. First, identify attack type used and how the results are normally determined. Does the attack take place on the IFT? Is it Close Combat? For IFT attacks, we get KIA, K/#, and Morale Check results. For To Kill tables, we get TK#. When using Close Combat, we use CCV (Close Combat Value).
Determining the Attack Table
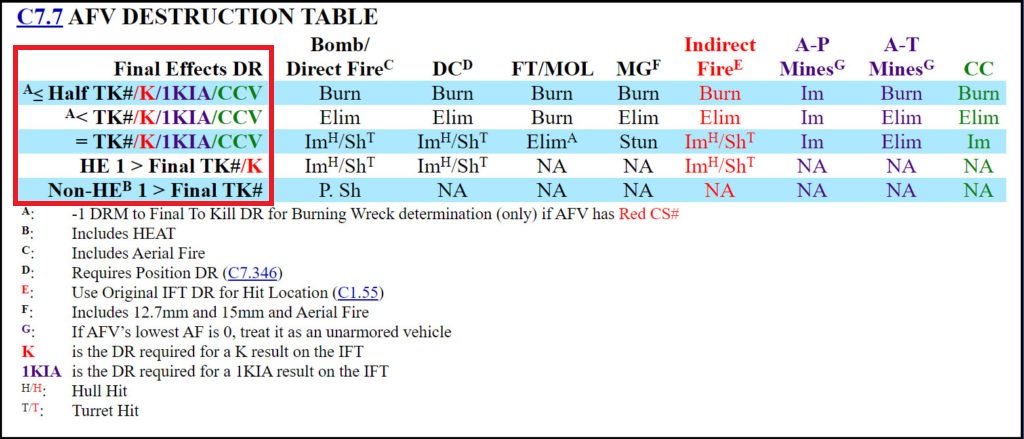
Next, you need to determine which column you will use to attack. These are in the red box in figure 2. So we have identified which table to use. But how do we apply these results versus an AFV? Each “attack type” column on the table is color-coded. These colors correspond to the colors used in the “Final Effects DR” column. In figure 2, you can see these highlighted in the red box. For example, the “Indirect Fire” column is red.
So, we should only be concerned with the Red “K’s” in the Final Effects DR column, and NOT the purple “1KIA’s”. For MG firing as Ordnance, we only care about the black “TK” results and NOT the red “K’s” or purple “1KIA’s”. This seems counterintuitive because MGs normally produce K and 1KIA results most of the time. Just remember, if the color of the result in the Final Effects DR column differs from the color of the Attack Type column, then you’re doing something incorrectly.
Once the attack type and table is determined, make an attack DR. Next determine the Final Effects DR result, and cross reference the Result row to the Attack Type column. Finally, ensure that the color of the attack result in the Final Effects Dr column matches the color of the Attack Type column.
An Example
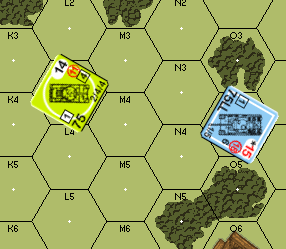
Refer to figure 3. It is the American PFPh. The American player recognizes his chances against the Panther are very slim. The basic TK# for the Sherman is a 14 and the Panther’s TCA/VCA armor is 14/18. Rather than attack with AP, the American player opts to attack with HE using Area Target Type (ATT). Per C3.332, resolved this attack according C1.55, meaning treat this as Indirect Fire.
The effect of HE using ATT is determined by rolling on the IFT. We know from above, the attack is using the “Indirect Fire” Column which is RED. Looking in the Final Effects DR column, the “K” is also RED. This informs us that the critical number on the IFT is the K/# result for that IFT column.
A 75mm Gun attacks on the 6 column when using ATT. From above, we know we are interested in the K/# which is a Final DR 3. To determine the result, everything is relative to the Final DR 3 needed to get a K/2 result on the 6 column. Per C1.55, there are no DRMs applicable to this Final DR. Lastly, per footnote E on the AFV Destruction Table, the IFT DR determines hit location. Putting this all together, we get (refer to the AFV Destruction Table):
- Eliminate the Panther as a Burning Wreck on a Final DR 1 (this result is not a possible in this example) since the Final DR is ≤ half the Final DR 3 needed to get a K/# result on the 6 column.
- Eliminate the Panther with a chance for crew survival on a Final DR 2 since this is < the Final DR 3 needed to get a K/# result on the 6 column.
- The Panther is Immobilized/Shocked on a Final DR of 3/4 since this is an HE hit which is equal to, and one great than, the Final DR needed for a K/# result on the 6 column. Shock or Immobilization depends on whether it hits the Turret or Hull.
- Any other result has no effect.
Example 2
Refer to figure 3. The Sherman’s attack fails to harm the Panther and the German player metes out retribution. The Panther attacks with its Main Armament and secures a hit. The results are determined based on TK#. We know the attack is a Direct Fire attack and the Direct Fire attack column’s text is in black. The Panther has a Basic TK# of 23. There are no modifiers. For the sake of clarity, assume it hit the Sherman in the hull. The Sherman’s hull Armor Factor is 11. Subtracting 11 from the base 23 TK, we arrive at a Final TK# of 12. There are no other relevant footnotes or modifiers. Comparing this Final TK# of 12 to the “Direct Fire” and black TK# in the Final Effects DR column, we get the following potential outcomes (please follow along on the chart):
- Eliminate the Sherman as a Burning Wreck on a Final TK DR of ≤ 6 since this is ≤ to half of the Final TK# of 12.
- Eliminate the Sherman with a chance for crew survival on a DR ≤ 11 since this is < the Final TK# of 12.
- The Sherman is Immobilized on a hull hit, Shocked on a turret hit, with a Final TK DR = 12 (ignoring Duds, C7.35) since this is equal to the Final TK# of 12.
- The Sherman is possibly Shocked (C7.41) on a Final TK DR = 13 (this is not possible in this example) since this a Non HE Final TK DR 1 > the Final TK#.
Example 3
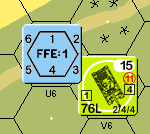
Our last example refers to figure 4. In this example, the German player has dropped a 100mm OBA next to a Sherman tank. Resolve OBA as Indirect Fire on the IFT. The text in the Indirect Fire Column is in red. Looking at the Final Effects DR column, we see “K” is in red as expected. Notice footnote E on the AFV Destruction Table. It says hit location is determined by the IFT effects DR. Also note there are no DRMs on the C1.55 chart. Recall, everything is relative to the K/# result on the 20 column (a Final DR 4). Putting this all together, we get the following potential outcomes (please follow along on the chart):
- Eliminate the Sherman as a Burning Wreck on a Final DR 2 since the Final DR is ≤ half the Final DR 4 needed to get a K/# result on the 20 column.
- Eliminate the Sherman with a chance for crew survival on a Final DR 3 since this is < the Final DR 4 needed to get a K/# result on the 20 column.
- The Sherman is Immobilized/Shocked on a Final DR of 4/5 since this is an HE hit which is equal to, and one great than, the Final DR needed for a K/# result on the 20 column. Shock or Immobilization depends on whether it hits the Turret or Hull.
- Any other result has no effect.
Conclusion
I hope this article makes sense. As I wrote it, I struggled to put this into plain text. The table always seemed intuitive to me. It surprises me that people struggle with it. I hope this article makes the table easier for these people to understand. For the rest of you, I beg your indulgence. This table is so fundamental to countering AFVs in ASL I had to make sure it was clear. Clearly understanding this table will also play a part in future Infantry vs. AFV articles I am working on. As always, I hope this helps in some small way. Until next time.—jim
FWIW, I did not find the table intuitive the first time I looked at it. It took a little bit of study for me to understand it. Like you, I have encountered people that have not figured it out 100% correctly.
Thank you for doing this! I have been struggling with the table. This is very helpful.