Jim’s 2022 comment: This blog entry appears courtesy of Multi-Man Publishing. This article originally appeared in ASL Journal 9 and is reprinted here with permission. Journals 1 through 10 can be purchased as a downloadable PDF from MMP’s website. I am grateful to MMP for allowing me an opportunity to reproduce this here and to correct the mistakes I made when this article was originally published. When writing a rules-based article, you do everything you can to get it right. This particular article was proof-read and scrutinized by many but sadly, my mistake made it through to the final article. I bear the responsibility for the error and I have been trying to correct it for a long time. It turns out that fixing a print article is harder than I thought–and I thought it would be hard to begin with. Many people in the intervening time have expressed appreciation for the article and I have been quick to say thanks but having to point out the mistake over and over was hard. At last, I can fix the mistake by posting here. Thanks for your indulgence.
As you read this article, text in italics–like this bit here–are new additions to the article added for this 2022 reprise. Text preceded by “Jim’s 2022 comment:” is just that, commentary to explain some of my thinking or errors I made. Text which is struck-through is text from the original article that is in error. Bold italic text is a correction to the original article.
Science of the Banzai
After proofreading Bret Hildebran’s article The Art of the Banzai, I provided a feedback comment that some people have misconceptions about the mechanics of Human Waves and Banzai Charges because the example in the rule book is a bit sparse. I further suggested that a companion piece to Bret’s article explaining these mechanics would be very timely. As we all know, no good deed goes unpunished and I should not have been one bit surprised when Chas asked how long such an article would take to finish.

For the purposes of this article, we will not discuss the tactical merits of the example offered, but will rather focus on the technical aspects of setting the Banzai Charge direction and properly marking the units taking part. If you want a better idea on tactical implications, please refer to Bret’s article prior to this one [Jim’s 2022 comment: This refers to Bret’s article in Journal 9]. Also keep in mind that while this article will specifically speak about Banzai Charges, the same movement principles apply to Human Waves, just using fewer units.
Let’s begin with the tactical position illustrated in Figure 1. Here we see the Japanese set up to conduct a Banzai Charge at an American position on board 37. PTO Terrain is in effect (G.1) including Light Jungle (G2.1).
Consulting A25.23, the first thing the Japanese player must do is select the units which will participate in the Banzai Charge. At least one unit must have LOS to an enemy unit – the “target” – and that target must be within 8 hexes of that Banzai unit. Looking over the situation, he elects to conduct a Banzai Charge with all of his units toward American squad Z. Having made that decision, he must now select a hex grain that includes the “target” and is also as close as possible – measured in hexes from the grain – to one of his units participating in the Banzai Charge.
Take a moment to look at Figure 1 to see some of all the possible (Alternate) Hex Grain options the Japanese player has between his HW units and squad Z. Surveying the situation, the Japanese player sees he has three options:
- Alternate Hex Grain N3/O4/P3/Q4
- Alternate Hex Grain N4/O4/P4/Q4
- Hex Grain N5/O5/P4/Q4
[[Jim’s 2022 comment: When I originally wrote this, I didn’t intend to imply these were the ONLY possible options. Sadly, my language was clumsy and didn’t properly convey my intention. My intention here is to show there is more than one option to chose from. I am sure others are available too.]]

All of these are at a range of 0 hexes, that is, each hex grain contains a unit participating in the Banzai Charge. He elects to declare a Banzai Charge using a HW Alternate Hex Grain (A25.231). He places Banzai counters on all participating units and places direction markers in 37M4 and 37S4, choosing Alternate Hex Grain N3/O4/P3/Q4 (and beyond; see Figure 2). It is important to note this creates a single ( alternate) hex grain (think alternate-grain Fire Lane, if that helps) between Japanese squad A and American squad Z which all Banzai units must consider when moving. This single “base line” hex grain (shown by the broken red line in Figures 2 through 6) will determine which units get marked with Hex Grain Range counters (A25.2321) during the Banzai Charge.
Before continuing, take a moment to refer to A25.2311 and the accompanying diagrams to see what the movement options are for the Banzai units. The movement options for an Alternate Hex Direction and a Hex Grain Direction differ.
First Impulse
( From this point forward Banzai counters have been removed for clarity.)
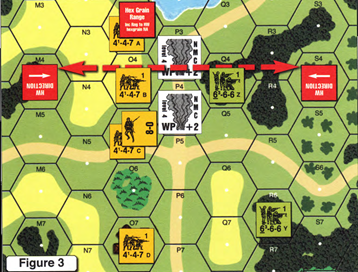
The Japanese player begins his Banzai Charge by moving each Banzai unit into a Forward Location (Figure 3). As each unit is moved, the Japanese player must determine if each is getting further from, or closer, to the base line (N3/O4/P3/Q4/R3/S4) established by the direction markers. Squad A, which started on the base line (range 0) moved off the line (i.e., it is now at “range 1 “) and is therefore marked with a Hex Grain Range counter (hereafter called simply a Range counter). Squad D remained at range 3 and is not marked. Squad B moved onto the base line (range 0) and is not marked. Squad C and the 8-0 leader decreased their ranges to the base line (from range 2 to range 1) and therefore are not marked. The Banzai Charge is considered to have spent 2 MPs for this Impulse since that is the MF cost of the most expensive Location entered by any participating unit (03, 04, and 07 all cost 2 MF).
Take a moment to make sure you understand why each unit was or was not marked with a Range counter. In my own experience this was the single most difficult thing to understand about Banzais, especially Alternate Hex Grain Banzais.
Second Impulse
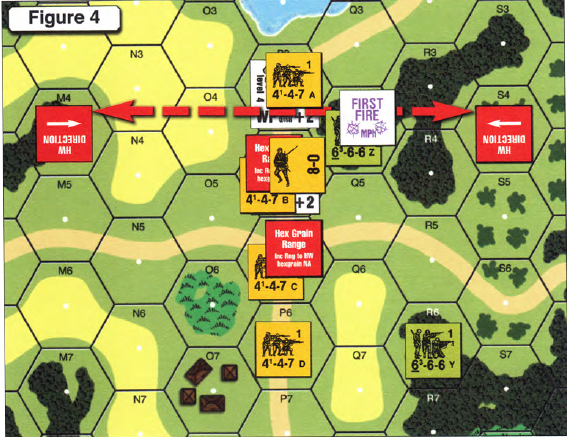
In the next Impulse, the Japanese player now moves his units into Forward Locations as depicted in Figure 4. We see that squad A has returned to range 0 and thus loses its Range counter. Squad B has increased its range (moving from range 0 to range 1) and is therefore marked with a Range counter. The 8-0 leader continued into a Forward Location while remaining at range 1 so it is not marked. Squad C, which was at range 1, is marked with a Range counter since it is now at range 2. Squad D continues to maintain range 3 so it remains unmarked. We also see that American squad Z has First Fired to no effect (no Residual FP counter is placed for the sake of simplicity in our example). The second Impulse also cost 2 MFs, for a total of 4 MPs spent so far.
Third Impulse
For the next Impulse, the Japanese have some interesting options. Squads A, B, and the Japanese leader have an enemy unit in a Forward Location. Referring to A25 .233, an enemy Location which is devoid of friendly units must be entered. However, reading further, once a friendly unit enters the Location in the current Impulse that Location is no longer devoid of friendly squads and the Japanese player can therefore choose to not enter that Location if his unit has other options. This allows the Japanese player some tactical flexibility on how he moves his Banzai and he can use this flexibility to put the American player under tremendous pressure.
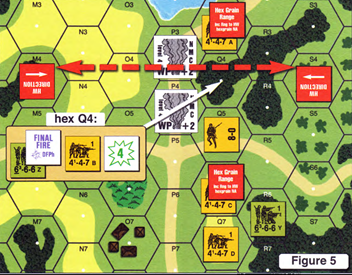
Referring to Figure 5, we see the Japanese player has moved his units for this Impulse. Squad B moved into a Forward Location and entered squad Z’s Location, ending B’s movement for this turn and marking squad B with a CC counter (A25.234). The CC counter is not depicted here for sake of clarity. Squad A elected not to enter squad Z’s Location, opting instead to move into its other Forward Location, increasing its range to 1 and receiving a Range counter. The Japanese leader also elected to not enter squad Z’s Location and maintained a range of 1. Squad C maintained a range of 1, but continues to be marked with a Range counter since it has yet to decrease its range to the base line. Squad D continued to maintain its distance. This Impulse cost 2MFs for a total of 6MFs spent on this Banzai Charge.
Once all of this Impulse’s movement has been completed, squad Z must Final Fire in accordance with A8.312. It must do so immediately after all Residual Firepower is resolved. The American player cannot wait to see the results of fire from other units directed against squad B before electing to fire squad Z. This will become more important in the next Impulse. For now, the American takes a Final Fire shot with no effect and leaves 4 RFP in its own Location.
Fourth Impulse:
[[Jim’s 2022 comments: Here is where I begin to make mistakes. To understand the mistake, take a moment to look at A25.2322. Summing that up here, a unit may not enter a Location it previously occupied nor a Location ADJACENT to such a Location. As you’ll see here, the example violates this rule.]]
For the next Impulse, the Japanese player has two units which could would like to move into Side Locations, Squad A and the leader. Each is Accessible to a Side Location which contains an enemy unit but cannot be entered per A25.2322. [[Jim’s 2022 comment: While it would be desirable to enter these Side Locations, movement into these side Locations violates A23.2322]] However, the Japanese player does not need to move units into the Location according to A25.233, but he may well want to consider the implications of A8.312 and forcing the American unit there to FPF. [[Jim’s 2022 comment: This remains true so long as the movement forcing the FPF is legal and done by a MMC. This is NOT an option in this example.]]
[[Jim’s 2022 comment: Pictured here is a corrected Figure 6 with Squad A properly advanced into R3.]]

In Figure 6 we see the final position of the Banzai units. Squad A opted to enter into a Side Location. [Jim’s 2022 comment: This move is illegal (A25.2322). Squad A can move into R3. It can also enter R2, since even though it is already marked with a Range counter, moving to R2 would not increase the range to the HW Alternate Hex Grain, it would remain at Range 1.] Squad A enters R3. The leader remained at range 1 and would not be marked. Squad C would have liked to enter squad Y’s Location but doing so would have increased its range from 2 to 3 so its only movement option was R5 to maintain a range of 2. Squad D was required to enter squad Y’s Location since it could and there were no friendly units in it. After the Japanese player moved all Banzai units for this Impulse and announced the MF expenditure, the American player would first resolve the Residual Firepower attack against squad A, and then conduct Final Protective Fire against squad A (and only squad A, since squad B is no longer moving). [[Jim’s 2022 comment: This is no longer true since Squad A could not enter the American Location.]] This Impulse cost 2MFs for a total of 8MFs, bringing the Banzai Charge to an end.
[[Jim’s 2022 comment: Pictured here is a corrected Figure 7 with Squad A properly advanced and marked Lax.]]
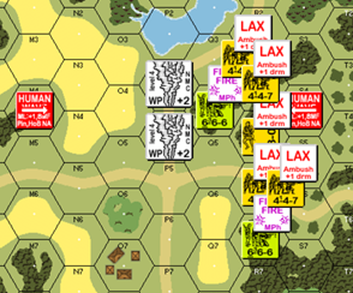
There is one important step remaining. All Banzai counters must be flipped to their “Lax” side. Lax status will add a + 1 drm to each Banzai unit’s Ambush dr, which could be important should squad C decide to Advance into squad Y’s Location in the Advance Phase. (see Figure 7).
These principles also apply when using a Hex Grain Direction Banzai Charge:
- Select the units which will be part of the Banzai Charge (including a leader);
- Set a Hex Grain direction which includes the target and has the closest range to a Banzai unit with a LOS to the target;
- Refer to the illustrations accompanying A25.2311 to see what each unit’s movement options are;
- While moving, determine if any Banzai unit has increased its range from the base line between two Impulses and, if so, mark it with a Range counter;
- Announce the movement factors expended so far by the Banzai Charge, and allow the DEFENDER to conduct Defensive First Fire for the Impulse;
- Repeat these last two steps until all Banzai units have either entered an enemy Location or have spent 8MF.
I hope this helps in some small way. BANZAI!!!


Thanks so much for this updated version of the article. I was helped by the original, but I was also concerned when I heard there were issues.
It took about a day for someone to point out the issue. I have tried to correct the record. I just haven’t been able to do so before now. I am glad I was finally able to correct it here. — jim