I recently published a correction to my first ever article here on my blog. While that article is now technically correct, it doesn’t accomplish what I set out to do: show how Banzai movement can provoke Final Protective Fire shots from the Defender. With that in mind, let’s re-examine that article and show how an Attacker can achieve this using the same situation as before. Let’s get started.
The Setup

Figure 1 is the same one appearing in my Journal 9 article, just reproduced in VASL. All Japanese units in the image will take part in the Banzai. As before, I have set the “baseline” although this one differs slightly from before. It targets the same American squad using an Alternate Hex Grain HW, but this time the Hex Grain is at the bottom. This means the grain goes through hexes N4/O4/P4/Q4/R4. These hexes are along the red arrow depicted in Figure 1.
As before, I will refer to the Alternate Hex Grain HW path as the “baseline”. The red arrow depicts the “baseline” in figure 1. When determining the range to the “baseline”, measure the distance between the units Location and the closest Location the arrow runs through to get the distance. All Japanese units are marked with a Banzai counter. I have removed the Banzai counters to reduce counter clutter.
Keep in mind that when moving, units may move into a Forward Location or a Side Location. There are limits on how to make these moves, so I refer you to my previous article. I also suggest you have a read of A25.23 – .234.
Impulse 1

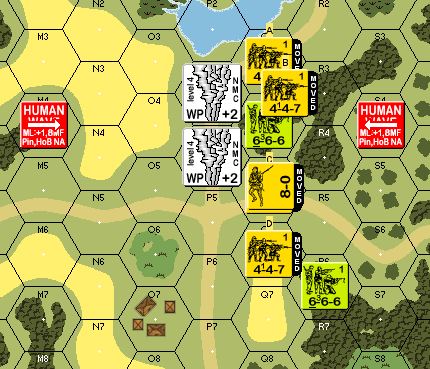
Figure 2 shows the end of Impulse 1. Squad A moves forward to O3. It remains at range 1 and not marked with a Range counter. Squad B moves forward to O4. It remains at range 0 and not marked with a Range counter. The 8-0 leader and squad C remain at range 1 and not marked with a Range counter.
Squad D was originally at range 2. At the end of impulse one, it is now at range 3. Since it has increased the range, mark it with a Range counter. This will limit squad D’s movement since it cannot increase the range again when so marked.
The Banzai has spent 2 MFs based on the single-most expensive move in this impulse. Three units tied at 2MFs each.
Impulse 2

Figure 3 depicts the map at the end of impulse 2. I have removed the red-line here to reduce clutter. Each squad moved into a forward Location. Squad D has reduced the range back to two and so has its Range counter removed. Squad B has increased its range from range zero to range one. It is now marked with a Range counter. Take a moment to refer to figure 1 and make sure you understand why squad B is now marked with a Range counter. In my experience, the hardest part about conducting Banzais and Human Waves is properly marking units with a Range counter. Failing to do so gives the Attacker more freedom of movement than the attack actually allows.
Assume the American Squad in Q4 fires and has no effect. It is now marked with a First Fire counter. Again, I don’t show the First Fire or Residual firepower (RFP) counters to reduce clutter. The missing RFP will not affect the example.
Again, this impulse costs 2 MFs, bringing the total MFs to 4. This is based on the 2 MFs squads A and B spent to enter the SMOKE Locations.
Impulse 3

Figure 4 shows the situation at the end of impulse 3. Since there are no friendly Japanese units in Q4, at least one Banzai unit must enter the Location. Squad B enters and simultaneously decreases the range. If entering Q4 would have increased the range, squad B could not enter the enemy occupied Location and squad A would have to instead. Once Q4 has a friendly Japanese unit in it, Squad A may enter Q4 or opt to continue forward. It continues forward to Q3. Squad C and the 8-0 enter Q5 while squad D enters Q6.
The American squad in Q4 must Final Fire per A8.312. This shot would be Triple Point Blank Fire but halved as Subsequent First Fire (SFF). Assume the shot has no effect on squad B and does not cower. This would place 4 RFP into its Location. Again, I removed the RFP counter to reduce clutter.
Assume the American squad in R6 fires for no effect and is marked First Fired. Again, this would place RFP, which is not depicted as it will not affect the example.
Once the impulse concludes, mark the Location with a CC counter per A8.31. The CC counter further prevents the Japanese unit from Moving or Advancing out of this Location (A25.234).
The Banzai spent 2 MFs on this impulse, bringing the total MFs to 6.
Impulse 4

Figure 5 shows the situation at the end of Impulse 4. Squad A cannot enter Q4 (A25.2322). A unit may not enter a previous Location–or a Location Adjacent to such a Location–that it occupied in a previous impulse. In impulse 2, squad A was Adjacent to Q4 and opted not to enter, instead entering Q3. Even though Q4 is now a Side Location occupied by an enemy unit–meeting the criteria of A25.232–it is not a legal move. It opts to move Forward into R3.
Squad C, however, can opt to move into the Side Location containing an enemy unit and does so. At the end of this impulse, mark squad C with a CC counter. Recall, there are 4 RFP in the Location which attacks the unit on entry. Assume this attack has no effect. Once the RFP has attacked, the American squad in Q4 must attack again–before all other units–per A8.312. As the American unit is Final Fired, this attack will also be Final Protective Fire (FPF). Not only will the Americans attack squad C with an 8 +0 IFT attack (see if you can work that out), the IFT DR will double as a Normal Moral Check (NMC) against the American 6-6-6!
The 8 -0 moves to R5. Take a moment and try to determine if we mark the 8 -0 with a Range counter. If you said no, you are correct. The 8 -0 was at range one in impulse 3 and remains at range one after impulse 4.
Squad must enter the enemy occupied Location R6 since there are no friendly Japanese units already in the Location. This again triggers SFF per A8.312. Since this is only SFF, it will not trigger a NMC for the American unit. Mark all units with a CC counter per A25.234.
The cost of this impulse is 2 MFs bringing the total MFs to 8, ending the Banzai.
The Completed Banzai

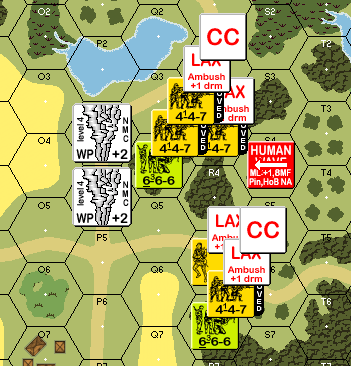
Figure 6 shows the completion of the Banzai. The Banzai counters are flipped to the LAX side and remain in place until after the Close Combat phase. This +1 Ambush drm will not matter unless the Japanese elect to Advance more units into the American unit’s Location. Recall, Ambush only occurs if units ADVANCE into the Location during the APh. The Banzai units did not Advance into the Locations.
All the CC counters are in place as well. Note, per A4.7, a unit covered by a CC counter may not Advance in the APh. Squad A and the 8-0 can opt to Advance in the APh since they do not have a CC counter. The rest of the Japanese units remain committed to Close Combat unless the American units broke, Voluntarily Break or combat result, and rout away. If the American units do rout away, remove the CC counter when the American unit’s leave. As such, the Japanese units are free to Advance. Alternatively, if the American units are eliminated in AFPh, remove the CC counter and the Japanese units are free to Advance. 1
Conclusion
I hope this new article shows there is more than one way to select a Banzai even when starting from the same position. I am also glad I can finally–and correctly–make the point I tried to make all those years ago. Crashing into an enemy’s Location multiple times can force enemy units to take FPF shots–and the NMC which accompanies it. As the Japanese player, using half squads and unstriped units to force these NMCs is a powerful tool. If you also have additional units around, or can move and use your Banzai units to do it, maneuvering to force failure to rout is a simple way to reduce the enemy. If all else fails, the Japanese can declare Hand-to-Hand CC and hope for the best. Until next time. – jim
A. Yes. Yes. [Compil3]


I don’t understand why you stated “Since this was not an FPF attack, do not mark the Location with a CC counter, even though we mark the Japanese unit with a CC counter per A25.234.”.
A25.233 says “Upon entry of an enemy-occupied Location, mark all units with a CC counter.”
Can you explain?
It’s a semantics thing, and arguably a difference without a distinction. As a result of this article, I have done a deeper dive into the CC counter. When it gets placed, when it gets removed, etc. Knowing what I know now, I have modified the article to make it more broadly correct. There is a lot of interplay in the rules here. Thanks for the comment.
Hi,
2 remarks :
Impulse 1 : “Squad B moves forward to O.”
This should be ” Squad B moves forward to O4.”
Impulse 4 : “Squad A cannot enter Q5 (A25.2322).”
This should be : ” Squad A cannot enter Q4 ( A25.2322)
Not?
I made the changes you noted. Thanks for the assist. Much appreciated. — jim
Hi,
I’ve some difficulties to understand what is happening in Impulse 2.
(The grain goes through hexes N4/O4/P4/Q4/R4)
– In figure 1 Squad B is in hex N4 and its range is 0. Ok.
– In figure 2 Squad B is in hex O4 and its range is still 0. Ok.
– In figure 3 Squad B is in hex P4 and its range should still be 0, how could it be otherwise? The Squad B is following the hex grain, how could its range increase?
You are correct. This feels like my 100th try at this article, it has been proofed and read dozens of times, and still errors creep into it. The mechanics are simple to explain but hard and tedious to get right.