
“Fortification” is an ASL catch-all term used to describe various terrain changing features captured primarily on ⅝” counters. I believe this characterization is too generic, hiding a subclass in plain sight. In my opinion, it is more accurate to say there are “Fortifications” and “Obstacles.” In this article, I will seek to break down the difference between the two and provide general advice on how to use them both. I will also examine the rules and Q&A covering their use. I hope when you’re through with this article, you’ll have a much better understanding of how to use “Fortifications.”
While Caves and Panjis are definitely Fortifications, this article won’t delve into those (see what I did there?). Caves are distantly similar to Pillboxes, although this is a gross simplification. Panjis are a lot like Wire. Perhaps I will do a second article covering these two at a later date. To be honest, I have played little with either, so I would have to teach myself first. For now, let’s focus on the others.
Before we get started, I want to make it clear this article primarily focuses on ETO play. I did this because I want to explain general principles. There are some specifics to PTO and DTO play, which I ignore in this article. This is a conscious decision on my part. Where I think it is appropriate, I will mention those specifics.
Philosophy on Placing Fortifications
Before placing Fortifications, we need to think about how attackers unhinge defenses. In ASL, there are three ways:
- Firepower–units shooting at other units
- Maneuver–moving units to advantageous positions, increasing risk to friendly forces
- Some combination of 1 and 2

Taken at face value, maneuver is far more effective, if for no other reason than the attacker has limited time to get some place. In almost EVERY case, the attacker will lose if they just sit there. Maneuver is the most important tool in the attacker’s arsenal.
With this in mind, proper placement of Fortifications and Obstacles in ASL is predicated upon fitting them into a coordinated defense. Obstacles disrupt the enemy’s ability to maneuver. Fortifications help protect your Infantry, sustaining their firepower. The principles of coordinating these are beyond this article. I encourage you to read My ASL Tactical Maxims article to see my method. To see my method in action, I encourage you to look at any of my scenario analysis articles.
Hidden Initial Placement
All Fortifications, as labeled by the rules, are set up using HIP. In Concealment Terrain, Fortifications remain hidden until a Good Order enemy ground unit ≤ 16 hexes away gains LOS, a unit in the Fortification uses the protective TEM, or a unit in the Fortification loses Concealment. Fortifications not in Concealment Terrain lose hidden status in the same manner, but the LOS range does not matter. In addition, hidden Fortifications do not cost MPs/MFs to enter and exit while hidden.1 There are limits, so review A12.33. This is an important point. Friendly units can fall back through hidden Wire Obstacles without needing to make an Exit dr to get “under” the Wire. This can create a nasty surprise for pursuing enemy units.
We begin with Fortifications.

Placing Fortifications
The aim when placing Fortifications is to provide additional “staying power” to your Infantry. Trenches, Entrenchments, Pillboxes, and Fortified Building Locations all have one thing in common: they provide additional Terrain Effects Modifiers (TEM). Such TEM reduces the effectiveness of enemy fire and increases protection of your own Infantry. This isn’t all they do. We will cover some of the additional benefits later.
All of this additional TEM will be important. The attacker is being funneled into a killing field. As the attacker’s firepower concentrates, the danger to defending forces increases. Fortifications help keep your Infantry safe by degrading the quality of incoming attacks. With your Infantry better able to survive, your defense can continue to put firepower into the enemy, increasing your chances of winning.
Entrenchments

Foxholes. Some love them, some are indifferent to them (including the author), some absolutely despise them. Some veteran players often refer to them as “death traps.” Newer players see them as the bulwark of their defense before watching their units get wiped out inside them. Foxholes’ reputation as “death traps” is partially well deserved, partially a misunderstanding of the correct use of Foxholes, and largely because of how entry and exit are modeled in ASL.
I won’t specifically cover Sangars, but they are a close cousin of Foxholes. They each share the same strengths and weaknesses. Sadly, Sangars are not created during play and are only available as OB-given Fortifications.
In-Game Creation And Purpose

Foxholes remain one of two Fortifications/Obstacles that can be created during play. The complete details are in B27.11. Basically, to create a Foxhole, a unit makes an Entrenching DR during the Prep Fire Phase. If the DR is ≤ 5–after all modifications for leadership, Labor status, unit size, and nationality distinctions–place a 1S Foxhole over the units taking part. The freshly dug Foxholes are the same as OB-given Foxholes in every way. They all share the same strengths and weaknesses.
The primary purpose of Entrenchments is to protect Infantry from OBA and enemy vehicles. We can see this on the counter itself. The TEM of a Foxhole is +4 versus OBA and Overruns (OVR). Against all other forms of fire, the TEM is only +2. But hidden inside this simple counter is a fatal design decision leading to their “death traps” description: getting out of them.
Death Traps
Per B27.4, units entering and exiting a Foxhole during the MPh/APh but pay 1 MF to get into or out of a Foxhole. This is in addition to the MFs spent to enter the Location containing the Foxhole. If that Location is Open Ground, FFMO applies to movement spent BEFORE entering the Foxhole.

For the defender, this means occupied Foxholes in Open Ground with enemy Infantry around are “death traps.” Exiting the Foxhole in Open Ground is subject to at least a -1 DRM. Concealed units trying to Advance into them lose Concealment for first moving in Open Ground in the LOS of enemy units.
Even Foxholes placed in non-Open Ground create problems for skulking. Exiting the Foxhole costs 1 MF. Enemy units with an LOS can fire at these units as they attempt to leave. If these units are using Non-Assault Movement, they would lose Concealment. A unit in the same tree line, but not in a Foxhole, easily skulks away or withdraws without losing Concealment. When planning a Defense, one must keep this weakness in mind.
Proper Usage
Given the strengths and weaknesses we have discussed, we can develop an idea of how to best use Foxholes. Do not place them in Open Ground. If another +2 TEM, or better, is available, use it instead. Do not put units in them and expect to use skulking to avoid fire attacks. If there is no other TEM available, Foxholes will work in a pinch. Use in non-Open Ground Locations and Assault Movement can somewhat mitigate the risks of getting out of a Foxhole. As always, the weapons at the enemy’s disposal will also help to guide placement.
Proper Usage: Last Stand

The most obvious usage for Foxholes is to create a last-stand defensive position. Units in these positions expect to sell their lives dearly, tying up enemy units trying to eliminate them. I identified a good case for this in my scenario analysis of Hazmo 5 The Blood Of Lambs.
In planning this defense, I decided the units inside Festung One would stand to the last man. I placed OB given Foxholes in the area I envisioned the last stand to take place. Besides OB-given Foxholes, I also plan on digging additional Foxholes in Locations NOT Adjacent to my OB-given ones. Digging the non-Adjacent Foxholes gives the Russian units better TEM and survivability. By being Non-Adjacent, it denies the attackers the benefit of better TEM as they seek to reduce the position.
Proper Usage: Skulking
When used with a Wall or Hedge, a Foxhole can create a “skulk” position. Units in a Foxhole and behind a Wall/Hedge have no LOS across the Wall/Hedge hexside beyond Adjacent same or lower level Locations. Units behind a Wall/Hedge can Assault Move into the Foxhole, get out of LOS, and then Assault Move out of the Foxhole to continue their defensive mission.
Proper Usage: Defending Against OBA/OVR
Given the +4 TEM against OBA and OVR, it should come as no surprise that Foxholes are great for defending against those attacks. But it isn’t as good as it might seem. If a unit is in a Foxhole and OVR in Open Ground, the -1 DRM for FFMO (D7.15) would still apply. A unit in a Woods Location attacked with Indirect Fire suffers the -1 Air Bursts (B13.3) DRM. The negative effects of these two terrain types aren’t particularly helpful. Setting up in Open Ground invites being OVR while setting up in a Woods Location invites Indirect Fire. If the enemy OB doesn’t include vehicles or Indirect Fire, these are not a concern.
Proper Usage: Routing

Perhaps the absolute best usage of Foxholes is setting up rout paths through otherwise Open Ground. Per B27.41, a routing unit may combine the MF to enter/exit a Foxhole with other MFs spent to enter a new Location. This allows a unit to rout through Open Ground, albeit slowly. A Foxhole placed in a Dirt Road Location between two Building Locations can allow a broken unit to rout through the otherwise open Road Location without being subject to Interdiction.
Consider Figure 4. The broken German unit must rout. Since MF into and out of a Foxhole may be combined with entry costs for the next Location, the Broken German unit routs INTO the Foxhole for a combined 2 MF. It then routs into S5 for another combined 3 MF. These combined MFs allow it to avoid Interdiction and Surrender.
Trenches

Trenches only come into play when given by scenario OB. They share many of the same strengths and weaknesses of Foxholes. It costs a MF to enter and exit a Trench. They suffer the same -1 DRM for OVR and Air Bursts where applicable.
In addition, Trenches do not tie into Adjacent terrain except by SSR. If a unit wishes to move from a Trench into an Adjacent Woods or Building Location, the unit must spend 1 MF in the Trench’s Location. If this Location is Open Ground, the unit would be subject to a -1 FFMO DRM. Some HASL modules have SSRs “fixing” this and these SSRs have crept into many modern scenarios. Pay particular attention to the SSRs before counting on this benefit.
Strengths
Trenches automatically connect to any Adjacent Trench counter not separated by a Cliff or Water Obstacle. Units can move from a Trench to an Adjacent, connecting Trench without paying entry costs. Regardless of terrain, movement between connecting Trenches cost 1 MF unless moving to higher terrain. When moving to higher terrain, the cost is 2 MF regardless of terrain. FFMO/FFNAM never apply when moving along a Trench line and units using Non-Assault Movement do so without Concealment loss. Minefields in a Trench Location do not attack units moving IN the Trench. Walls, Hedges, and Wire are no Obstacle for units moving IN a Trench.
Once possessed by a side, friendly units may move from a lower Location directly into a Trench without paying the 1 MF entry cost (B27.6). Notice, to make this move, the moving side must control the Trench first t or the Trench must be part of the side’s OB. Also note, this movement to and from lower elevations also applies to Sangars.
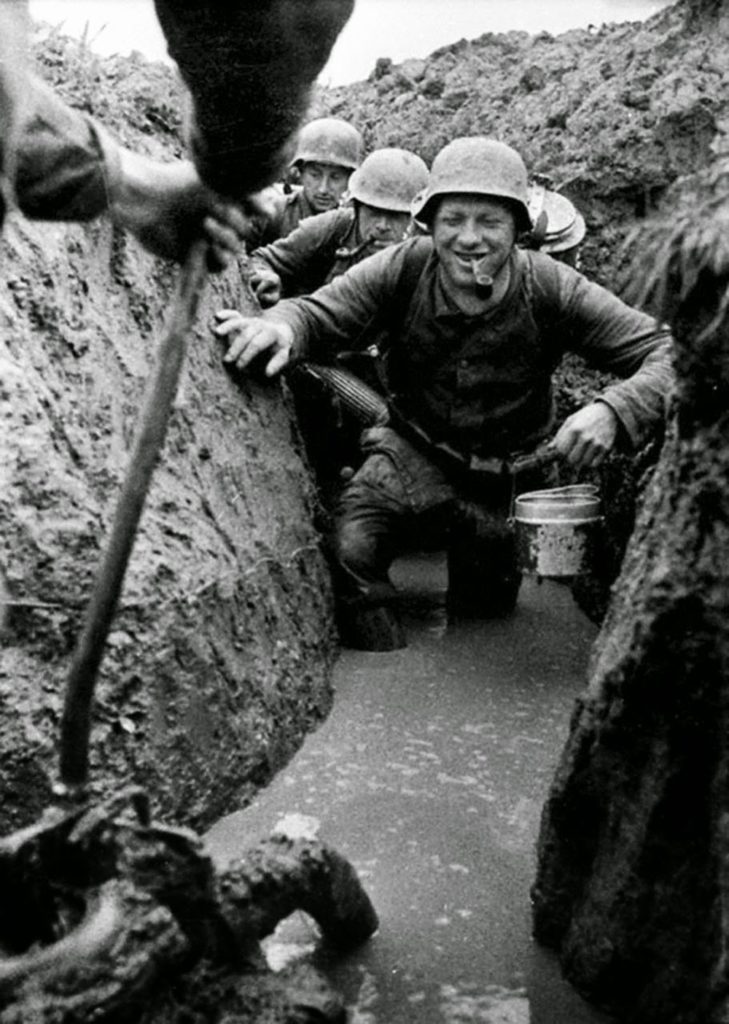
Only fully-tracked vehicles may enter a Trench Location but must take a Bog Check on entry. All other vehicular entry is prohibited. A Trench can serve not only as a Fortification, but may double as an Obstacle in a pinch. The odds of a fully-tracked vehicle Bogging are slim, but inhibiting all truck and halftrack movement could be a significant degradation to enemy maneuver options. Also notice, since Trenches do not connect to Adjacent Terrain. Vehicles can easily bypass these “hasty” obstacles, so plan accordingly.
Units rallying in a Trench receive the -1 terrain Bonus (A10.61). Interestingly, Trenches are not legal rout destinations (A10.51). When setting up Trenches, keep in mind how your units will rout. Bad planning can see your units compelled to rout and subjected to Interdiction.
Proper Usage
There are few downsides to using Trenches, especially when connected in a system of interconnected Trench counters. Placed on top of a hill, units can safely skulk into lower terrain and advance back up without CX concerns, even into a Woods Location. The rally bonus makes them good rally points. Still, take care to include a legal rout destination some place close by.
A well-constructed Trench line can be very difficult to assault, particularly if on high ground. Remember, to move directly INTO the Trench from a lower level Location, the Trench must be Controlled by that side (or be part of the side’s OB). An enemy assaulting from a lower elevation must first move someone into the Open Ground from below to Control the Trench Location. This unit moving up won’t receive the benefit of the TEM. Punish them accordingly.
A well situated and planned Trench line can be the bulwark you build your defense around. Make sure it is well situated as the units in Trenches are fairly static. If an SSR allows you to tie Trenches into Adjacent terrain, make sure you account for that. Such an SSRs better allows for easy tactical relocation.
Trenches: An Example
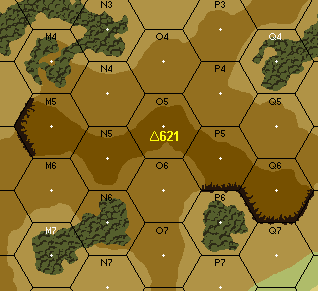
Refer to Figure 6. The Attacker is tasked with taking all the Level 3 Hill hexes pictured. The Defender is given 4 Trench counters as part of his OB. How can the Defender best place his Trenches to defend an attack coming from the top of the figure?
Right off, Trenches placed in P5/Q6 and P6 will not connect because of the Cliff hexsides. Recall, Trenches are not valid rout destinations. Units breaking in a Trench still require a valid rout destination when routing. Units which break in Q6/P5 have to rout to P6. This could be problematic for units in Q6, as routing through P5 would likely get closer to Known enemy units.
The N6 hex is a much better rout destination. It is not only out of the likely LOS of approaching attackers; it is also downhill from a Trench line on the ridge. Broken units can exit directly into the lower elevation without having to pay the Trench exit cost. When moving back into the Trench, they move directly into it without paying the entry cost.
My Solution
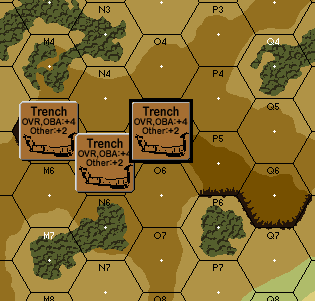
Given 4 Trench counters, M5, N5, and O5 are great positions for Trenches. Units in these Trenches have good TEM and good rout options. A leader in N6 can police up the broken units. N6 can also be a good place to store a local reinforcement to fill in gaps emerging in the lines. Units moving from N6 onto the hilltop enter directly into the Trench counter.

The last Trench counter is a bit of a dilemma. P5 is an interesting choice. P5 offers good fire opportunities to the flank and is likely the best option because of this. Broken units in P5 can still rout to N6 under most circumstances. M4 and N4 are also good options. The best, closest TEM for the attacking units is the Woods in M4. Putting a Trench in that Location pushes the Attacker back away from the hilltop. N6 isn’t a bad option but probably not the best. Personally, I would opt for P5.
Finally, in the Defender’s turn, skulking out of the Trenches into M6, N6, and O6 should protect defending units from attack. If the Defender has a local reserve, he could constantly shuffle concealed units up onto the hilltop. As the Attacker closes in, Concealment can shield defending units from much bigger attacks.
A-T Ditches

The rules covering Trenches also apply to A-T Ditches. The biggest change is no vehicle can enter the A-T Ditch Location, including fully-tracked vehicles. Infantry enter and exit an A-T Ditch for 2 MF, but otherwise move along an A-T Ditch for 1 MF.
This similarity to regular Trenches includes their lack of tying into Adjacent terrain. A vehicle can bypass an A-T Ditch. This surprises many newer ASL players.
Proper Usage
You can use A-T Ditches in much the same way you would normal Trenches. While this doesn’t seem to be the intent, the rules allow it. We have already discussed usage in this way.
It is also interesting that Infantry/Cavalry can cross from “one side” of an A-T Ditch to the “other side” as if it weren’t there. This includes activities such as pushing a Gun across the A-T Ditch. Wagons are vehicles and thus not able to enter an A-T Ditch Location.
Inside the base game, A-T Ditches contain the same weakness Trenches have: they do not connect to Adjacent terrain. In setting up a defense, remember to tie an A-T Ditch into the terrain/defense. Vehicles can (and will) bypass an A-T Ditch left “hanging” at the end of the line. Many veteran ASL players have taught this is a harsh lesson to new players.
Some third-party products have SSRs tying A-T Ditches into Adjacent terrain. If there is no such SSR, consider placing one A-T Ditch counter in the No-Go terrain itself. Absent that, make sure the Adjacent Location is not bypassable or covered with fire. A wreck along a hexside can block bypass movement too.
A-T Ditch Example
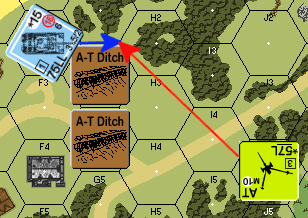
Refer to Figure 8. The A-T Ditches placed in G3 and G4 do not “tie” into the terrain in G2 or G5. Thinking he recognizes a rookie mistake, the German player bypasses the Obstacle along the G2/G3 hexside. The American player is no rookie, however. He is covering his obstacle with fire power and reveals a hidden AT Gun in J4 which has LOS to the G2/H2/G3 vertex. Not only does the Gun have LOS, the shot attacks the weaker side aspect of the Panther. If the Panther is Immobilized/Wrecked along the G2/G3 hexside, no other vehicles can use VBM along this hexside.
Pillboxes

A Pillbox can only be OB-given. They can set up in Open Ground, Woods/Jungle, Brush/Bamboo, or Grain/Kunai Location. Like all Fortifications, a Pillbox sets up using HIP and can remain hidden until an enemy unit gains LOS [EXC: See G.2 when playing PTO]. Unlike other Fortifications, the contents of a Pillbox also set up using HIP. When revealed, the contents of a Pillbox remain hidden. They are revealed per (B30.7). However, attacks against Concealed occupants of a Pillbox are not halved and Case K is NA.
A Pillbox creates a second Location in its hex. The MF spent to enter/exit a Pillbox cannot be combined with other MF. Once the unit spends a MF to enter/exit, all fire directed at the unit is considered to be in the new Location. Fire directed at a unit OUTSIDE the Pillbox cannot hurt units “IN” the Pillbox and vice versa. SMOKE cannot be placed IN a Pillbox, so the extra +1 for shooting from a SMOKE Location never applies to units in a Pillbox.
Remember, all Fortifications can set up using HIP (A12.33), and if a Pillbox sets up hidden, so does its contents (B30.7).
Pillboxes in PTO
I encourage you to read G1.632 when playing with Japanese Pillboxes. Reveal Pillboxes per G.2. Units setting up using HIP in a Pillbox are in addition to any the Japanese normally receive. A Japanese Pillbox also sets up with a Tunnel entrance which has many nefarious purposes (B8.6-.63). Japanese units in a Pillbox do not go Berserk, they Battle Harden instead (G1.62).
Mechanics of Pillboxes
The first number of a Pillbox represents its stacking capacity, the second its Covered Arc Defense Modification, and the last its Non-Covered Arc Defense Modification. Pillboxes come in two flavors: brown and gray. The only difference between them is brown Pillboxes are more easily destroyed (B30.92).

A Pillbox is Rally terrain and broken units receive the -1 Terrain Bonus DRM (A10.61). Also, a Pillbox is a valid rout destination forcing units to rout towards them (B30.5) unless closer terrain exists or the Pillbox is ignorable. A Pillbox cannot be Overstacked. Even when occupied, a Pillbox remains a “rout magnet” for broken units. Placing a Trench in the same Location can mitigate the effects of units routing towards a Pillbox. Keep in mind a leader IN a Pillbox cannot Rally units OUTSIDE a Pillbox, because he is in a different Location.
A broken unit inside a Pillbox is never forced to rout from it, even if the broken unit is ADJACENT to enemy units.
A unit cannot enter a Pillbox occupied by enemy units, even if those enemy units are broken. To gain Control of a Pillbox, a friendly unit must enter the Pillbox. To gain Control of a Pillbox hex, you must also gain Control of the Pillbox in that hex. Unless Ambush occurs or Infiltration is possible, gaining control of a Pillbox is often a two turn endeavor.
Pillbox TEM is not cumulative with other TEM in the Location [EXC: Mud/Deep Snow]. Hindrances in the Location apply normally.
I also recommend you pay particular attention to B30.2 for LOS to and from a Pillbox and for limitations on shooting in its own hex from inside a Pillbox.
Guns In Pillboxes
Guns set up in a Pillbox are still Emplaced. Gun target size is NA when shooting Ordnance at a Gun in a Pillbox (B30.32). Case K never applies when shooting at Pillbox contents. This INCLUDES the Concealment afforded by HIP (B30.21).
Guns in Pillboxes are vulnerable to HE Equivalency shots from AP (B30.35). I recommend you have a read of my previous article on the subject.
Bunkers
A Pillbox with a Trench in an Adjacent, accessible hex is a Bunker. Remember, a hex is Adjacent with itself so the Trench can be in the same hex or an Adjacent hex. In such a circumstance, the Pillbox is still a Pillbox. For movement, however, a unit may move from the Adjacent Trench into the Pillbox, and vice versa, as if the Pillbox were a Trench. There are some limitations on this movement when an enemy unit is in the Pillbox’s Location. Refer to B30.42, B30.44, and B30.6 for details
Proper Usage
The above was an awful lot to digest, and I didn’t even cover every aspect of a Pillbox. Still, from this we can glean a Pillbox is powerful if part of a Trench system. Turning Pillboxes into Bunkers makes them even more effective, especially if you place a Trench in the Pillbox hex. Giving the Location a Trench gives units occupying the Pillbox a place to provide all around firepower rather than just within the Pillbox’s CA. The Pillbox is still available to rout to if needed, although not being able to Overstack the Pillbox can cause routing issues.
Place Pillboxes in the heart of the defense if available. Their high TEM and Rally Bonus gives extra resiliency to units inside. Because they, and the units inside, are set up using HIP, they can be used to mask areas where you are particularly strong.
Align their CA to accomplish the mission you set for them as part of your cohesive defense. Sometimes this means covering a particular avenue of attack. Sometimes this means showing your invulnerable NCA to the expected approach. As long as it’s part of the plan and you have accounted for how you plan to use it, it can be integrated into a strong defense.
Fortified Location
Fortified Buildings are only available as part of the at start OB. Fortifying a Building Location adds +1 to the Building’s Inherent TEM. Unless Breached (B23.9221), enemy units cannot enter a Fortified Location occupied by an unpinned, Good Order, armed squad (or its equivalent). Even upper levels of a building can be Fortified, but only if all lower levels in the same hex are Fortified as well. A Gun of any target size and type can be set up in a Ground Level Fortified Building Location. An ART/AT/INF Gun ≤ 76mm may be set up in an upper level Fortified Building Location.
Fortified Locations may be exchange for a Tunnel per B8.6. This Tunnel exchange is not reference in B23.9x. The placement of Tunnels and usage are covered in B8.6. Tunnels allow units to safely through and pop out Concealed in the APh. Clever usage can allow units to emerge into Rally Locations or key enemy stacks for Close Combat opportunities. Tunnels can also be used to allow safe routing opportunities.
Otherwise, Fortified Locations are just like any other building Location.
Proper Use
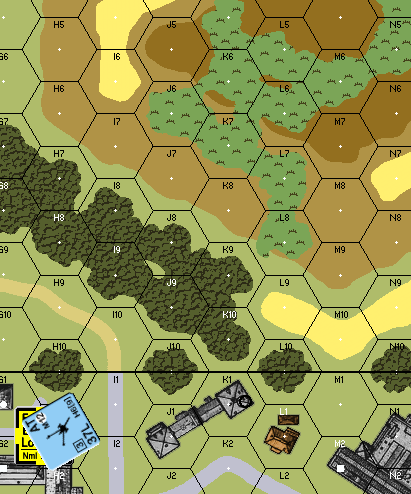
Fortified Locations make great options for stand-or-die defensive holds. Because an unpinned, armed Good Order unit can block entry, getting into a Fortified Building is difficult.
If given multiple Fortified Building Locations, adding an AT Gun to an upper level Fortified Building Location can come as a surprise, particularly if unexpected lines of sight become available. From an upper level, a Gun can see over walls, hedges, and rubble it wouldn’t otherwise be able to. Consider Figure 10. This is from Hazmo 3, Seaside Retreat. In this scenario, the attacker has six halftracks and must use them to move across the width of the board. Coming across the board 78 Hill is a significant threat. Here, the German player has invested all three Fortified Building Locations (Ground, Level 1, and Level 2) to place an AT Gun covering the hilltop. This could be a nasty surprise for those pesky French halftracks.
Obstacle Placement
Now we will move on to Obstacles. The aim of Obstacle placement is to restrict enemy movement and force enemy units into kill zones away from vulnerable flanks. Tie Obstacles to the terrain for greatest effect. A Roadblock that can be moved around using Vehicle Bypass Movement (VBM) is no Obstacle. Instead, combine this Roadblock with a non-bypassable Location or some other No-Go terrain to hamper the enemy’s ability to move across the battlefield.
It’s just as important to tie Obstacles to the overall concept of the defense. Cover Obstacles with firepower or they might be easily removed. Firepower must cover the pathways the enemy is channeled to and exact a heavy toll from attacking units crossing the area.
Prepared Fire Zones

Prepared Fire Zones (PFZ) are not listed as a Fortification in ASL. They do not get the benefit of setting up using HIP. Still, they create LOS where none existed before and help to create kill zones. They don’t create TEM. The new LOS cuts both ways. Improper placement can expose your own units to fire. I think of them as Obstacles and not Fortifications.
PFZ are used to create an LOS where none exists. This is an attempt to model clearing the terrain to create fields of fire. A side’s OB may give several “factors” with which to place a PFZ. Placement of a PFZ converts the board’s terrain to the type listed on the counter.
Convert a brush, vineyard, orchard, cactus patch, olive grove, gain, palm tree, or kunai hex to Open Ground for one PFZ factor. Convert a woods, forest, pine woods, jungle, or bamboo hex to a Vineyard hex at a cost of one PFZ factor. Note, per B36.22 a created Vineyard PFZ can itself be converted to an Open Ground PFZ.
Proper Use

Set up PFZ to allow fire from critical defensive hard points into enemy movement corridors. By doing this, you create LOS to attack enemy maneuver. Given the narrow “corridor” like nature of the PFZ, the most likely target will be Infantry. Shooting at fleeting vehicular targets with limited aim penalties makes hitting vehicles unlikely. Offset limited LOS issues with bore sighting or get creative with placement.
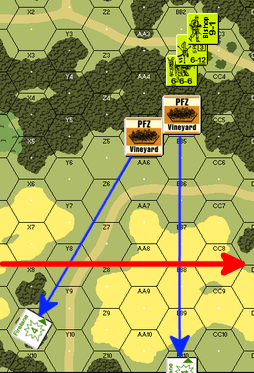
To block LOS, the LOS obstacle must appear on both sides of a thread drawn between the source and the target. A LOS along a hexside of a PFZ hex is not blocked. LOS exists between the American and German squads.
Keep in mind vineyards are “soft” Hindrances. Such Hindrances negate the FFMO penalties for Fire Lanes. FFNAM will still apply. Optimally, place PFZs to the “oblique” and open up Fire Lane opportunities hindering the forward progression of enemy Infantry. PFZs opened to the oblique shield defending units from direct fire from the attackers’ jump-off positions. Notice in Figure 13 how the American unit has two separate Fire Lane options while not being directly exposed to fire from the enemy coming from the left edge of the image. The vineyard represents a “soft” Hindrance. While that Hindrance cancels FFMO, enemy units are still subject to a -1 FFNAM DRM when using Non-Assault Movement.
Wire

Wire is a Fortification which hinders Infantry’s movement. Infantry moving through a Wire Obstacle must first pay terrain entry cost to enter a Wire Location. Once in the Location, Infantry are placed “on top” of the Wire counter, and must then make an Exit dr to determine how many MF they spend to get “below” the Wire. 2 A unit cannot leave the Wire Location until they are “below” the Wire. Units stuck on Wire are vulnerable to CC, suffering a -1 DRM to CC attacks against it. All attacks by units on Wire receive a +1 DRM.
A unit may not use Double Time in the turn in which they attempt to move beneath the Wire. A broken unit which routs onto Wire must make an Exit dr to get “below” the Wire. If they cannot make it “below” and remain ADJACENT to an armed, unbroken, Known enemy unit, eliminate the broken unit for failure to rout. Eliminate units that break in an Open Ground Wire hex and cannot rout away because of the Exit dr.
Infantry cannot bypass a Wire hexside. Wire “sort of” ties into ADJACENT terrain. A vehicle may bypass such a hexside but must pay the extra MP costs and take all the requisite Bog Checks along the way.
Trucks, armored cars, and halftracks may enter a Wire Location at a cost of 4 MP plus the cost of terrain. Besides all the other Bog Check modifiers, Wire adds a +2 DRM. Even fully-tracked vehicles must pay the movement costs and Bog Check, but a 1 on the colored die of a Bog Check DR removes the Wire counter from play if the Bog Check is made int he Wire hex.
Proper Usage
Frederick the Great said, “He who defends everything defends nothing.” Your defense can’t be everywhere. Thinly spread like this, it will be easily overrun and defeated. The best use of Wire is to slow an enemy’s approach to a key defensive position or to slow movement along a corridor. It bears repeating to drive the point home; Wire attacks an enemy’s ability to maneuver. The intent is to compel the attacker into kill zones covered by the bulk of your forces.
To make wire as effective as possible, cover it with fire. It’s not enough to cover the passages between the Wire. Optimally, shoot enemy units as they attempt to get under the Wire. Shooting at them as they get “on” the Wire leaves Residual FP in the Location, which will attack the first unit–and every unit thereafter–as they roll to get beneath the Wire.
Remember, as long as Wire remains hidden, there is no need to roll to get beneath the Wire. As a Defender, this should be a consideration of when and where to fall back.
Minefields

In some ways, Minefields are much like Wire. They attack the enemy’s ability to maneuver, but they do so with firepower. There are two kinds of Minefields: A-T, or Anti-Tank, and A-P, or Anti-Personnel.
Units which enter or exit an A-P Minefield are attacked on the IFT column of their listed factors. They attack surviving units again on exit. A KIA result on an armored vehicle Immobilizes that vehicle. Unarmored vehicles are attacked on the ★ Vehicle of the IFT column and resolved normally. Of special note, AFVs with an unarmored side or rear, and AFVs whose lowest hull armor factor is zero are considered unarmored for an A-P Minefield attack. This especially concerns U.S. halftracks.
Only Wagons or vehicles entering and exiting their Location trigger A-T Mines. Infantry/Cavalry do not trigger an attack. Also note, Motorcycles do not trigger an A-T Minefield attack either. When a qualifying unit enters an A-T Minefield, roll one die. If the dr is ≤ the factors on the counter, the vehicle has struck a mine.
A-T Mines attack on the 36 column of the IFT. Immediately eliminate as a Burning Wreck, unarmored vehicles (including those with an unarmored aspect or whose lowest hull armor factor is zero). Eliminate armored vehicles as a Burning Wreck on a Final DR ≤ 3 (4KIA). On a Final DR ≤ 6 (1KIA), eliminate the armored vehicle. Otherwise, Immobilize the AFV where it is.
Daisy Chain
These represent A-T Minefields portaged and placed by the MMC using them. They are an A-T Minefield. They can be deployed into an AFV’s Location even as the AFV enters it. If an SSR grants you a Daisy Chain, take a moment to read B28.531 before the game to make sure you know how it’s used.
Odds Of An A-T Minefield Attack
Outlined below are the chances of an AFV being successfully attacked by an A-T Minefield. Keep in mind, the attacker does not know the Minefield factors until the Minefield attacks a unit. You can use this uncertainty to your advantage.
| A-T Minefield Factors | Odds of Attack on Entry | Combined Entry/Exit Odds |
| 1 | 16.67% | 29.44% |
| 2 | 33.33% | 55.22% |
| 3 | 50% | 75% |
| 4 | 67% | 88.89% |
| 5 | 83.33% | 97.21% |
Minefield Exchange
A-P Mines may be exchanged for A-T Mines at a rate of 3 A-P factors for every 1 A-T factor. The reverse is not true. It’s worth considering exchange for A-T Mine factors if you have limited AT assets.
Hidden Movement
Unlike other hidden Fortifications, hidden Minefields will affect friendly units even while still hidden. Eliminate Dummy stacks moving in to/out of a Hidden Minefield.
Proper Usage
Use Minefields to deny terrain to an enemy. Minefields can effectively cancel projected rally points on an expected avenue of attack. Minefields placed in Building Locations attack enemy units as they enter and exit the Location through a non-Building hexside.
Like Wire, Minefields are most effective when used to channel the enemy into kill zones. This channeling effect extends to unarmored vehicles as well. Like Wire, they are most effective when covered with fire from defending units, but don’t have to be. Beware of uncovered Minefields when the enemy has fully-tracked vehicles. These place a Trailbreak through a Minefield, allowing safe passage for Infantry. In addition, Infantry can attempt to clear a path through both A-P and A-T Minefields. Covering fire removes this luxury.
Roadblock

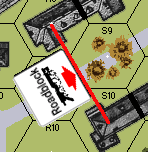
Like many other Fortifications, Roadblocks are OB-given. Roadblocks must be set up in a Road or Runway Location with its arrow pointing at the hexside blocked. Notably, a Roadblock extends from hex center dot to hex center dot (see Figure 17). Treat a Roadblock like a stone wall. No vehicle may cross a Roadblock hexside.
Unlike other hidden Fortifications, even when hidden, a Roadblock affects friendly movement. Infantry and Calvary may cross it as if crossing a stone wall. Friendly vehicles are prohibited from crossing just as if it were on board.
Proper Usage
Like other Fortifications, Roadblocks must be covered by fire. They are most useful when tied into the surrounding terrain. Referring to Figure 17, notice how it ties into the terrain. The S10 hexside is not bypassable on the bottom of the image. Placing them covering the entrance or exit to a Bridge can completely stop vehicular traffic across the bridge. A Foxhole placed behind such a Roadblock allows Infantry to hold the Roadblock. Such Infantry can skulk into the Foxhole and leave LOS.
Roadblocks impede vehicular maneuver, friendly and non-friendly. Take care not to affect your own maneuver.
Since they are “stone walls,” they are a ½ level Obstacle. Leverage this to block LOS at the same level. They also count as Hull Down Locations to vehicles parked behind them. This can cut both ways, so plan accordingly.
Rubble/Debris


These are not technically Fortifications. Occasionally, though, an SSR will give some number of Rubble counters to be placed. The principles discussed concerning Obstacles are still worth considering.
Rubble counters placed in Stairwell Locations can deny upper level Building hexes to advancing attackers. Knocking down Buildings and other LOS Obstacles can open up LOS to defending units in upper level Locations and offer additional tactical flexibility. At the ground level, it can block LOS, giving units a chance to move. As the Defender, use this to your advantage.
Units cannot Bypass cannot Rubble hexes. Defenders can use this restriction to their advantage. There’s a reason Rubble and Debris placement is before each side sets up. As the Defender, make sure you tie your Obstacles and Fortifications into the terrain for maximum effect.
Rubble is no longer a building, and thus not a rout destination, nor does it receive the Rally Terrain Bonus (A10.61). This can deny the enemy rally terrain necessary to reconstitute his force.
Complex Obstacles
Complex obstacles are more a plan than a thing. With a complex obstacle, you’re trying to influence the enemy’s movement such that he stumbles from one Obstacle to the next. Imagine an enemy moving along a flank pursuing a unit falling back before them. The unit disappears into the Woods. Following up, they come into LOS of some Wire which they now have to roll to get beneath. The running unit has stopped just behind the Wire to protect it with firepower.
Not liking his chances, the attacker opts for a different path through a Gully where he stumbles into a Minefield. A hidden unit also pops up and First Fires at the unit on entry. Does the attacker stop there? Does the attacker continue forward? If the attacker continues, a unit which breaks exiting a Minefield remains in the Minefield. Since the RFP hasn’t attacked the units yet, the RFP attacks units returned to the Minefield.
Not liking his chances down that avenue, the attacker chooses another line of approach, only to discover a hidden Bunker with an HMG laying down a Fire Lane and closing out this avenue of approach.
A Roadblock closes off another avenue. The attacker sends Infantry forward to clear the Roadblock, only to find A-P Mines in the Roadblock Location.
Complex obstacles give the attacker tough decisions. The more tough decisions the attacker faces, the more likely he is to make a bad one. As the attacker blunders into one Obstacle after another, he wonders if the defender just has his number. The attacker comes under pressure as the clock runs out. As desperation sets in, favorable defensive opportunities will inevitably present themselves.
Conclusion
This has been a rather long article. As I was writing about it, I thought about various types of defenses. Each of these defense archetypes place different emphasis on the usages of Fortifications and Obstacles. It occurred to me there is likely room for a broader explanation of these defenses. This is why I focused on mechanics and purpose. Still, I think an accompanying article on types of defenses will work really nicely with this one. Look for that soon.
I hope this article provides food for thought on Fortifications in ASL and provides people with a good foundation for using them effectively. I know this has been a long article, but I hope you also find it useful. Until next time. – jim
Q: Per A12.33, “[a] unit entering/exiting a hidden Fortification pays no MF/MP to do so, provided that Fortification remains hidden including Infantry/Cavalry (only) crossing a roadblock hexside.” Infantry pays no extra cost for entering a Wire or Panji Location, but rather pays to move beneath the Wire/Panji [B26.44; G9.4]. Is this considered “entering” hidden Wire/Panji, and so costs 0 MF?
A. Infantry going beneath Wire is “Wire Exit” and thus costs no MF if the Wire is hidden. This is not the case for vehicles, however. Panjis are entirely different per the last sentence of G9.4.
Q: Do the non-MF related restrictions apply, e.g. can a CX/dashing unit cross HIP Wire [B26.46]? A. Yes, e.g., no.
A. No; each individual unit has to make its own Wire exit dr.


Dear Jim,
Greetings from Southern California! A very well written article. Thank you so much for sharing what you do and helping to improve our little community.
I have one question for you on this article that you’ve written. In the section for Anti-Tank Ditches, you show a Panther bypassing a wood hex. An American antitank gun fires and you state that it would hit the Panther in the side. It looks like it hits it in the front armor. Would you be kind enough to explain to me how the line of fire hits the side armor?
All the best!
Robert Hammond
I had to look at the article first to make sure I hadn’t made a mistake =^> When using VBM, the hit location is not determine like it is otherwise. The hit location is determined by which VCA the firer occupies. I covered this in a previous article (https://jekl.com/2021/10/21/missing-example-guns-as-targets-bonus-afv-in-bypass/). Let me know if you have any further questions. — jim
Jim,
WOW!!! I just read your article that you referenced. Both points are fantastic. Once again, I just learned something. Two things really. I have been playing this game for almost 30 years. Well, since I just learned something, I am going to bed!
All the best,
Robert
=^ > This why I write them 🙂 I am glad you found something new in it. — jim
Very good information, as usual.
I’ve recently had the revelation that one use of SSR-given rubble placement is to prevent VBM Freeze. If the enemy wants to freeze your units in the hex they have to enter with a fully-tracked vehicle, spending 1/2 its MPs, and roll for Bog with a +3 DRM. No VBM in Rubble.
Just think about how much faster this would have come had you read the article earlier 😀 I am glad you find my work useful. This is why I do it. — jim