


Today’s article borders on pedantic. Some might say it has built a castle well within pedantic lands. To be fair, I agree with the latter. This article briefly discusses the mechanics of bypass movement and how to represent it properly when moving your pieces across the board.
Now some will ask “who cares?” Others will ask “why does it matter?” I believe we should all care because proper placement of your pieces speeds up play by making your intentions clear. If you cannot make your intentions clear, then your opponent has to stop your movement and seek clarity to understand his options. Let’s look and see what I mean.
What is Bypass Movement?
Bypass movement allows an Infantry unit to move through a woods or building hex without entering the obstacle in the hex. This allows the unit to pay the “other” movement cost in the Location rather than the cost to enter the terrain. Usually, this “other” terrain is Open Ground making movement through the bypassed Location much easier.
Like most things in ASL, there are some Locations which you cannot bypass (Terrain Blaze, woods-gully Location, etc). I encourage you to have a read of A4.3 to familiarize yourself with the rule.
Bypass movement also creates an Atypical LOS situation. I encourage you to read (A6.12) as I will not cover this too much here. Knowing how these LOS work is key to understanding your options when conducting Defensive First Fire.
Assumption
For this article, we are going to assume the unit bypassing is not broken or pinned during its move. Refer to A4.3x to see the implications of this.
Bypass Options

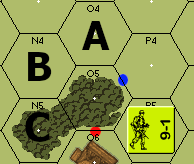
Refer to figure 1. The 9 -1 leader has three destination options for bypass movement: A, B, and C. In each case, the 9 -1 Bypass O5 via one or more hexsides at a cost of 1 MF. Let’s see how the moving player properly places his counter to depict his intention.
One Hexside Bypass
Refer to figure 2. The 9 -1 may execute a 1 hexside Bypass for one Movement Factor (MF) to either hex O4 (A) or N5 (C). To move to hex O4, the 9 -1 would move via the O5/P4 hexside. To properly depict this, the place 9 -1 on the blue dot and the moving player announces a 1 MF expenditure. From the blue dot, the 9 -1 can then move onward to O4.
To move to N5 (C), the 9 -1 would move via the O5/O6 hexside. Since both O5 and O6 are Bypassable, the 9 -1 moving player would have to state clearly which Location is being Bypassed. It is also worth noting the notation for both passes would be different. Per A2.2, list the Location ACTUALLY occupied first. When noting a Bypass of O5, list the 9 -1’s Location as O5/O6. If the 9 -1 Bypassed O6, note the 9 -1’s Location as O6/O5.
In either case, the moving player places the 9 -1 on the red dot and announces the hex entered in bypass for a 1 MF cost. The 9 -1 can continue from there onward towards hex N5 (C).
Two Hexside Bypass

Refer to figure 3. The 9 -1 can also move to N4 (B). To make this move, the 9 -1 would move via the O5/P4 and O5/O4 hexsides. Notice O5 is first for each of these hexside notations to let the reader know the 9 -1 is IN O5.
To depict this movement, place the 9 -1 counter on the yellow dot and the moving player announces a cost of 1 MF. If it survives all incoming fire, the 9 -1 can then move onward to N4 (B).
Bonus: Special Consideration
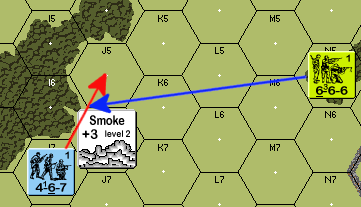
Refer to figure 4. The 4-6-7 wishes to move to J5 via bypass of I6. This Bypass movement is via the I6/J6 hexside. Per A4.3, SMOKE only adds a movement cost when moving through a Location containing SMOKE. Here, the SMOKE is in J6 so the 4-6-7 pays no additional cost in MFs to transit the I6/J6 hexside
When the 4-6-7 gets to the I6/J6 hexside, the 6-6-6 declares a shot at the I6/J5/J6 vertex. What is the DRM? Some players will claim the I6/J5/J6 vertex contains SMOKE from the J6 hex and claim a +3 DRM for the SMOKE, combined with a -1 First Fire Non Assault Movement (FFNAM) for +2 DRM. This is completely wrong.
To be hindered, the Line of Fire (LOF)–synonymous with LOS–must pass “through” the hindrance. The vertex I6/J5/J6 exists simultaneously in three Locations. I6 is not affected by the SMOKE in J6. As such, the 6-6-6 qualifies for a -2 DRM (FFNAM and First Fire Movement in the Open (FFMO)). There is also a Q&A reinforcing this.1
Conclusion

Thanks for bearing with me. I know precision in movement is tedious. I also know that being precise in your movements makes your intention clear and negates the need to seek clarification. Clarity of action speeds up play. Your opponent doesn’t need to first ask what you’re doing before considering his options. Thanks for indulging me on this.
The SMOKE thing is also a small pet peeve of mine. I include it here to spread the gospel. Players intuitively know the SMOKE doesn’t apply when they don’t spend the additional MF to enter Bypass. I never understand why those same people will claim the hindrance DRM. The Q&A referred to came from a game I watched at Bitter Ender and subsequently submitted to Perry for clarification after the fact. Keep this in your back pocket. You will find someone who wants to avoid the MF cost and still claim the DRM.
I hope you enjoyed this brief foray into my flavor of madness. Until next time. – jim
A unit in 62N8 (level -1) wants to bypass the Lt Jungle hex in 62M9 (level -1) along the M8/M9 hexside. There is a Palm tree location in 62M8 (level -1) and another Lt Jungle Hex in 62N8. An enemy unit fires from 62P6 (level 0) tracing LOS to the M9/N8/M8 vertex. The LOS passes through the Open Ground portion of 62N8 but does not pass through M8. Would the LOS be blocked by the inherent Palm trees in 62M8? The larger question would be, when tracing LOS to a vertex made up of a target hex w/out inherent terrain and other hexes w/ inherent terrain, must the LOS pass through the actual hex w/the inherent terrain to be affected by it?
A. The LOS is not blocked. Generally speaking, The LOS must cross the hex (including hexside) to be affected
The embedded graphics in the .pdf version aren’t rendering correctly (noticed this on the last article as well). They are pixelated and stretched across the pages they appear on. Not sure if there is a conversion issue.
I know Paul. I have sent a note to the vendor but they are not replying to me at this point. I wish there were another option but sadly, this is the best one. Sorry for the inconvenience.
Excellent point about SMOKE DRM when using Bypass.
Thank you so much for this article. As someone who is transitioning from SK to ASL, this is a most helpful example of a new procedure I’d not been exposed to yet.
I am glad you find it helpful. If you have any other questions or article suggestions, please feel free to contact me. — jim
Truly an advanced move concept.
Denoting which hexside(s) being bypassed at the time of MF expenditure is crucial…”bypassing O6″ is insufficient and is not good practice. I think the “Counter not oriented in the hex” rule would be a good one to punish your opponent the one time he’ll need it to teach the importance of counter positioning “within” a hex.
Hey Jim
Found your (now oldish) article when researching query from a recent game.
The query is whether is legal to bypass a single hexside such as the O5/P4 hexside in figure 2 above, and then move to P4.
I feel that this should not be allowed, as inferred from your words and the EX accompanying A4.31 in the rulebook.
Is this something you have an opinion on and how do arrive at this viewpoint?
TIA
Tim
I saw on FB that you found your answer. Sorry I am still away from home.