
Snipers have not been covered much in ASL literature. Perhaps the most influential article is Mark Nixon’s Hyper Sniper: A SANe look at this threat in ASL. I have spent the last two days re-reading this article. I am going to summarize what I took from this article here. If you are looking for something to read this holiday season, I cannot recommend this article enough.
Frequency
One of the best points Mark makes in this article is how infrequently sniper attacks occur in ASL. First, not every DR can produce a sniper. Even if the DR can produce a sniper, the player must roll the Sniper Activation Number (SAN). Mark adds this interesting table where he lays out the number of sniper attacks a player can expect.
| Sniper Possibilities (Expected number of attacks per 100 SAN capable dice rolls) | ||||||
| SAN | 2 | 3 | 4 | 5 | 6 | 7 |
| Total SAN rolled | 2.77 | 5.55 | 8.33 | 11.11 | 13.88 | 16.67 |
| Chance sniper attack | .92 | 1.85 | 2.77 | 3.70 | 4.62 | 5.55 |
| Chance SAN dr 1 | .46 | .92 | 1.38 | 1.85 | 2.31 | 2.77 |
What I find most interesting about this table is how infrequently snipers actually attack. Even a SAN 7 will attack less than 6 times per 100 eligible DR. Mark says “we are not playing the game to exercise concern over (these small probabilities)”.
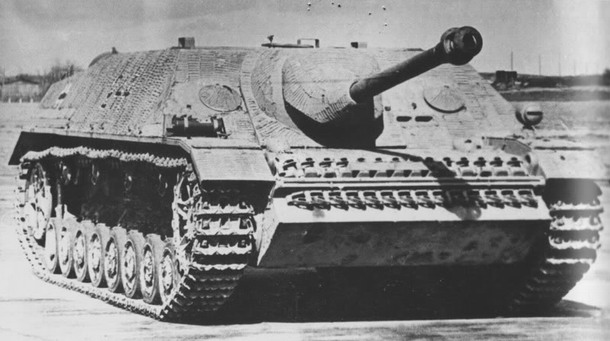
| Real World Example I was playing Robert Maglica in a scenario at Supporting Fire. Rob’s SAN was a 2. Then to hit the most valuable unit, a CE JagdPz IV, Rob had to roll direction 4 at a distance of 5 or greater. All things considered, Rob had a 1/32 * 1/6 * 1/6 * 1/3 chance for a sniper to attack and RECALL the Jagd. This amounts to a 1 in 3456. Knowing this, I took the risk and went CE with my Jagd for a 16% increase on a TH DR when his Badger spent one to start. This is me we are talking about so of course my first attack roll of the turn was a 1,1 on placing a fire lane triggering the chain of events leading to my Jagd’s recall. |
Sniper Abatement
Mark describes sniper abatement as keeping your best units safe from a sniper attack while using less valuable units to soak up the attack. He discusses a couple of measures we can take to cut down on the odds of being catastrophically affected. Per Mark, sniper abatement consists of stacking, sniper bait, the geo board-based limitations of SAN activations, and TEM. Let’s look at these.
Stacking
Mark calls this “piling on”. The more units you have in the same Location as your valuable unit, the less likely it is to hit a valuable unit. Mark included this table:
| The Reality Of Piling On | |
| Number of units in the stack | Percentage of shots hitting your valuable unit |
| 1 | 100 |
| 2 | 58.3 |
| 3 | 42.1 |
| 4 | 34.0 |
| 5 | 29.2 |
| 6 | 26.1 |
| 7 | 23.4 |
| … | |
| Infinity | 16.67 |
The gist of this table is the more units you have in the Location, the less likely you are to have your valuable unit selected to take the sniper attack. This table also counts for ties in the random selection dr and presumes our opponent will select our valuable unit.

There is a point of diminishing returns. You can never reduce the odds below 16.67% since this is the odds you will roll a dr 6 with your valuable unit. Putting these units into one Location makes for a very tempting target and will definitely draw fire to itself. Dedicating a significant portion of your OB to “piling on” will deprive your side resources you might need elsewhere.
Mark’s last advice is to stack two units with a valuable asset, in rare circumstances, three when you have to have a kill stack. I think this remains sound advice. There are better ways to isolate your valuable units from a sniper attack.
Sniper Bait
Mark next talks about Sniper Bait. This is the most effective sniper abatement activity there is. Again, the idea is to place low value units into lower TEM Locations around your valuable unit. Correct placement means the SAN selection DR will always miss your valuable units unless the Target Selection DR lands directly on your high-value unit’s hex. This works for two reasons. Properly placed, one of these units will always be closer to the sniper counter’s Location after the Target Selection DR. On those rare circumstances when they aren’t closer, they will be equidistant to the sniper counter’s Location. In those instances, A14.21’s select the lower TEM as the final target location kicks in and selects the “bait”.
The interesting thing about this is Dummy units work great for this. It doesn’t matter that both you and your opponent know they are Dummy units. The sniper doesn’t care. Who among us isn’t prepared to sacrifice two Conscript half squads to protect our 9 -2 from a sniper attack? I know I am. You could even use a SAN counter placed in low TEM near your kill stack to eat up a sniper attack. This may not be the best use for a SAN 2 or SAN 3. Even a low event SAN is still a chance to cause havoc but there may be a time when this is the best play.
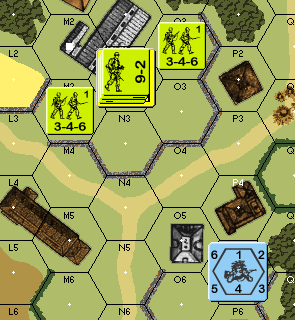
GEO
This is an artifact of the board. When a SAN activates, it can only move along one of six hex rows to one of 6 hexes. It cannot even land in its own hex. If your valuable unit is not on one of these “kill lanes” the sniper can never land directly in your stack. Used with Sniper Bait, it is impossible for your valuable unit to be struck with the first Sniper Activation. It is impossible for the sniper counter to land directly on the valuable unit. It may do so on a second or subsequent attack since the “kill lanes” change as the sniper’s position changes.
Based on this, Mark suggests placing valuable units off the “kill lanes” where possible. This doesn’t mean you should forgo +3 TEM and great lines of fire just because it is on a “kill lane”. Remember, the odds of a SAN landing directly on your kill stack is about .15%. If you’re using Sniper Bait, then alternative Target Selection should always select one of them.
In my personal experience, I seldom use this tactic. I prefer to select positions based on tactical need rather than letting the sniper affect my decision making. I have used this principle for placement of my own SAN on defense. Knowing where he might set up kill stacks and how my sniper might get to those definitely affects my thinking there.
TEM
We covered this earlier. When Alternate Target Selection kicks in, units with lower TEM are selected before units in higher TEM. We use this with Sniper Bait to protect valuable units.
Mark wraps this section by observing that we should use the higher TEM for our valuable units, toss in Sniper Bait if we have resources to spare, and glance at our GEO from time to time but not to focus on it. Mark states TEM is the cornerstone of protecting valuable units. I agree with Mark’s observations and find they are consistent with my game play. I don’t think I can improve on this.
Further Commentary
Mark spends a couple of pages on how to generate more SAN opportunities for your own side and how to create “sniper free” zones on the map through careful setup procedures. Marks spoke to things like SAN initiative, movement sequencing, shot sequencing, Sniper Checks, and other means to maximize your SAN while minimizing his. I think each of those topics are worth pursuing and I recommend you do that. I provided a link to the original magazine above.
It is worth keeping in mind just how unlikely a SAN is at the various levels. Spending a lot of time trying to mitigate the effects of a SAN at the expense of fulfilling the VC is probably not going to help you win more games. Still, I recommend you take the time to go read the rest of the article. There are plenty of gems waiting to be discovered.
| What Could I Have Done Differently Lets revisit my earlier example and ask what we could have done differently. For starters, if the AFV were BU, it would not have been an eligible SAN target. Given how pivotal that AFV was to my defense, it was probably better off being BU than CE. If I had done that, it would not have risked Recall. The cost of that was about a 16% chance to TH (Base TH 9, +1 BU, +2 Hindrance). Moving the Original TH DR from 6 to 7 is the greatest possible swing we can make in the DR. Given the Badger’s chance to flame my Jagd, I needed every chance I could get. Second, I could have used a half squad as Sniper Bait to absorb the SAN. I was already off the SAN “kill lane” so I only had to be aware of where it could go and how it would count to my Location. This is something that just slipped my mind during game play and I paid for it. Even knowing the outcome, I think the 1 in 3456 chances of the SAN was well worth the risk of being CE. It didn’t work out for me that time but I would do it again. I hope I remember the Sniper Bait next time. |
Conclusion
Unless you are new to ASL, you are probably already familiar with Mark’s work. If you are new, there are few better ways to spend your ASL time than reading Mark’s work. Mark, along with Robert Medrow, is one of the most influential ASL authors. He writes clear, concise articles. Even when he touches on math intensive topics, he breaks them down into very understandable language making it easy for most to learn from. Take it from someone who reads and writes a lot about ASL. Check out Mark’s work. It is time well spent.
Excellent and concise summation of Mark’s article. One of many facets of the game that I absolutely love/hate: the sniper. I find that SAN has a great effect on the game within the game. High SAN means fewer low-odds shots. A pinned (or eliminated) enemy sniper means plenty of 2+3 shots!
Cheers!
Thanks for another excellent piece, and I agree that Mark’s original article is a classic. As you imply, it all comes down to risk management: even if the chances of a sniper hit are remote, if the effect could be catastrophic then it’s at least worth some mitigation, and maybe avoiding completely by keeping those AFVs BU if in sniper range.
As a PS, there’s an error I’ve seen several times when the attacker begins entirely off-board. In this case, the defender must place their sniper BEFORE these attacking forces set up off-board (it’s a pre-game action whereas the attacker’s forces are Turn 1 reinforcements). Could influence where the attacker chooses to enter, or whether their AFVs are BU.
I see this error all the time too. I make it myself several times a year. I try my best to catch it. When I make it, I tend to let my opponent set my SAN up as they see fit or wait until the first SAN “active” SAN and use that to “move” it onto the board.
Try to tell Chad Cummins that snipers come infrequently. LOL
I think talented players tend to hate sniper mechanics more than others. It is uncontrollable and can’t lose the game for you for no reason. There is little to no skill involved.